> ## Documentation Index
> Fetch the complete documentation index at: https://docs.projectdiscovery.io/llms.txt
> Use this file to discover all available pages before exploring further.
# Internal Network Vulnerability Scanning
Internal network security is critical yet often overlooked. Once attackers gain initial access through configuration drift, phishing, or compromised credentials, they can rapidly expand their foothold by exploiting internal vulnerabilities. This lateral movement can lead to devastating breaches, making internal vulnerability scanning as crucial as external assessments.
ProjectDiscovery offers two distinct approaches for internal network vulnerability scanning, each designed to fit different organizational needs while maintaining our core focus on exploitability and accurate detection.
Use pd-agent for seamless internal scanning through our platform. Perfect for large networks and centralized security management.
Run Nuclei locally and upload results to PD's platform. Ideal for teams with existing scanning workflows or specific network restrictions.
Internal scanning helps identify misconfigurations, unpatched systems, and security gaps that could be exploited for lateral movement before attackers can leverage them.
## Method 1: Agent based Scanning (Recommended)
To use this feature you'll need to install and deploy pd-agent within your internal network. The agent acts as a bridge between your internal infrastructure and ProjectDiscovery's platform, enabling you to trigger and manage scans remotely.
### What is pd-agent?
pd-agent is a lightweight agent that you deploy within your internal network to execute scans and enumerations remotely. It establishes a secure outbound connection to ProjectDiscovery's platform, receives scan configurations, and runs them locally. Nuclei, httpx, naabu, dnsx, and tlsx are all built into the agent — there's nothing else to install on the host, and nothing in your network needs to be exposed publicly.
**Key Capabilities:**
* **Multi-Tool Scanning**: Runs Nuclei, httpx, naabu, dnsx, and tlsx — vulnerability scanning, port discovery, HTTP probing, DNS enumeration, and TLS inspection, all from a single agent
* **Network Discovery**: Automatically discovers the host's subnets on registration. Inside Kubernetes it discovers node IPs, pod CIDRs, and service CIDRs and reports them to the platform
* **Vulnerability Scanning**: Execute Nuclei-based scans using templates from the ProjectDiscovery platform
* **Network Routing**: Assign each agent a network name (`-agent-network`) to route scans to specific sites, data centers, or VPCs
* **Parallel Execution**: Splits each scan into chunks and runs them concurrently, auto-tuning parallelism to the host's available CPU for faster completion
Agent based internal scanning is an Enterprise-exclusive feature. Free users can still perform internal scans using the local scanning method described below.
**System Requirements**\
The agent is designed to be lightweight and efficient. Minimum recommended specifications for optimal performance:
* **CPU:** 2 vCPU
* **Memory:** 4GB RAM
* **Network:** 100Mbps network interface
* **Storage:** 10GB available disk space
* **Operating System:** Linux (recommended), macOS, or Windows
These specifications are suitable for most deployment scenarios. A basic VPS (Virtual Private Server) meeting these requirements is sufficient for running pd-agent efficiently.
**Distribute large scans and discoveries across multiple agents.** For large networks, deploy **several agents with the same `-agent-network` name** instead of one big agent. Agents sharing a network name automatically fan in on the same scans and discoveries — work is split across them with no leader and no manual sharding, so two agents finish in roughly half the time. This is the recommended setup for any sizeable internal environment. See the [scaling guide](https://github.com/projectdiscovery/pd-agent/blob/main/docs/scaling.md) for autoscaling.
### Step 1: Create a Network
Before installing the agent, you need to create a network in the ProjectDiscovery's platform. Each network represents a distinct internal environment (e.g., production, staging, office network) and generates a unique agent configuration.
1. Navigate to [https://cloud.projectdiscovery.io/internal-network](https://cloud.projectdiscovery.io/internal-network)
2. Click **"Create Network"**
3. Provide a network name
4. Save the network to generate your unique agent installation command
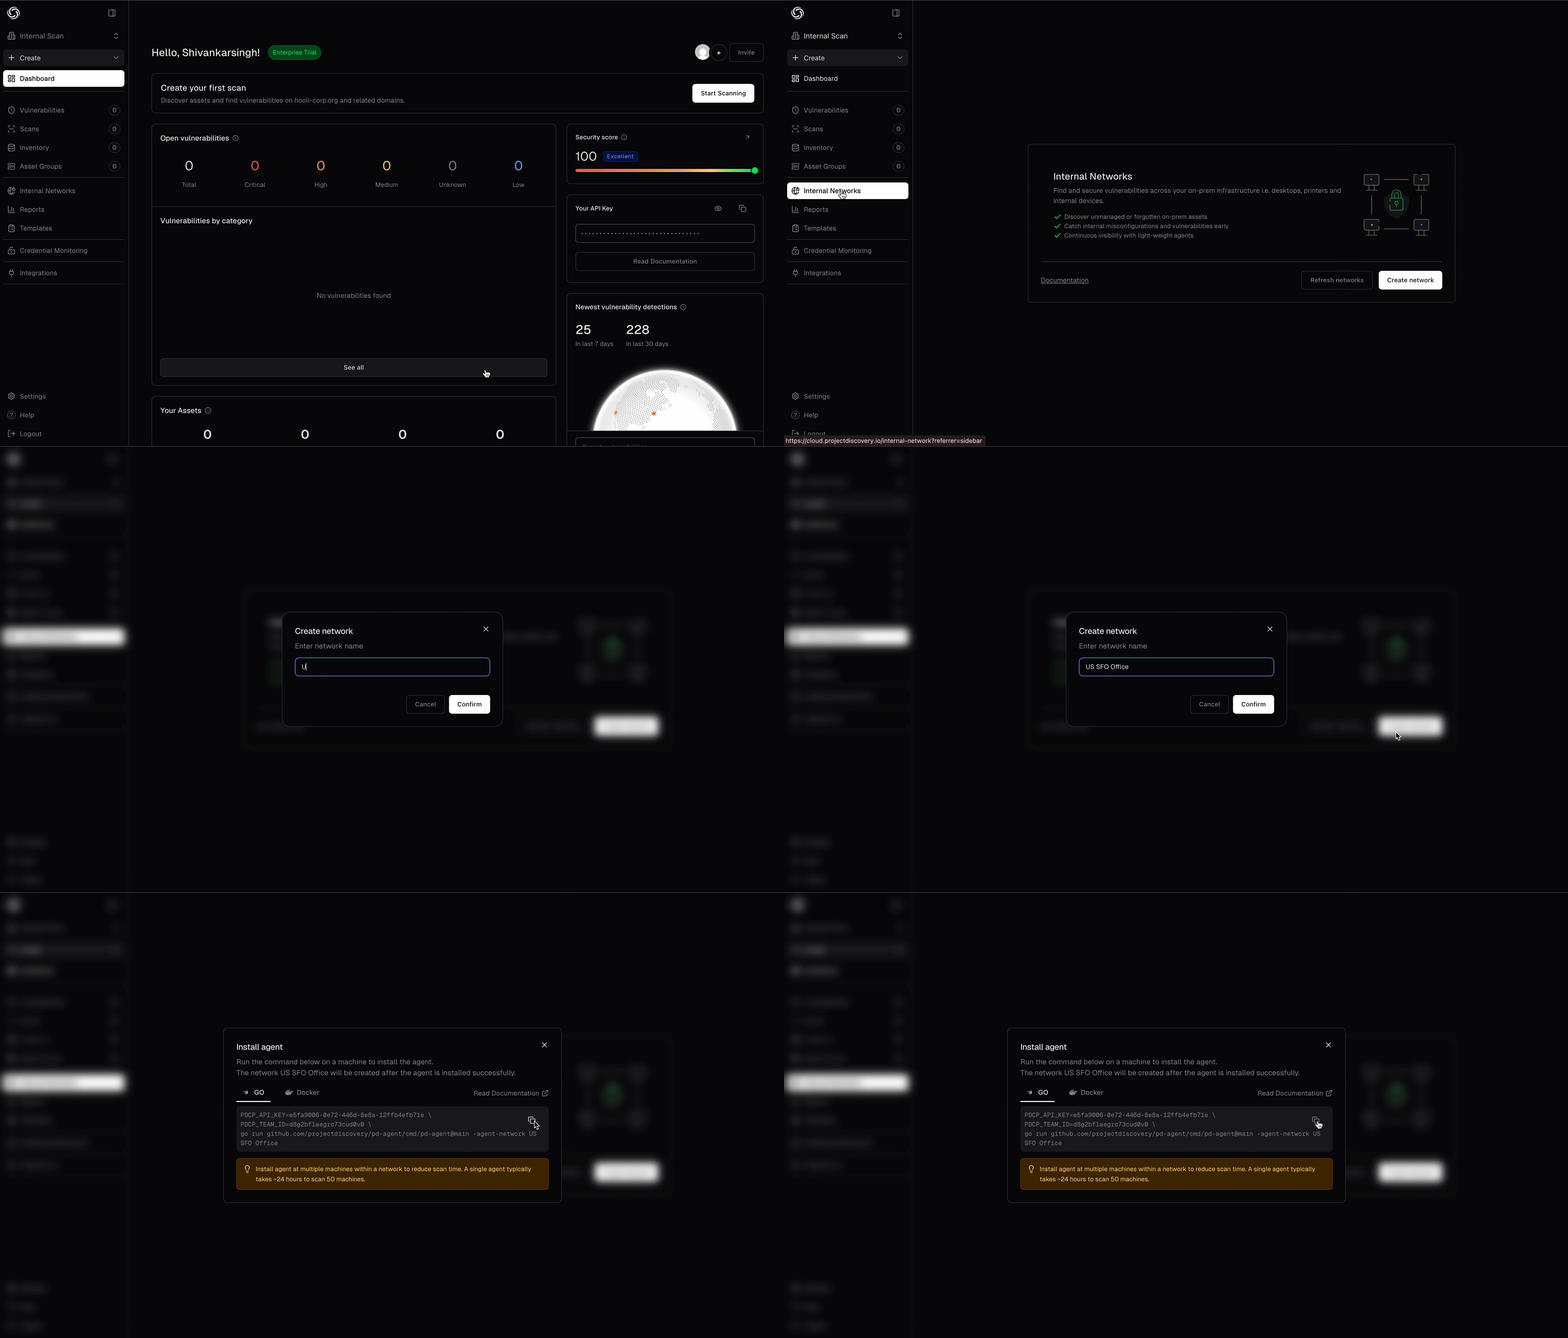 You can create multiple networks for different environments or network segments. Each network can have one or more agents deployed.
### Step 2: Install the agent
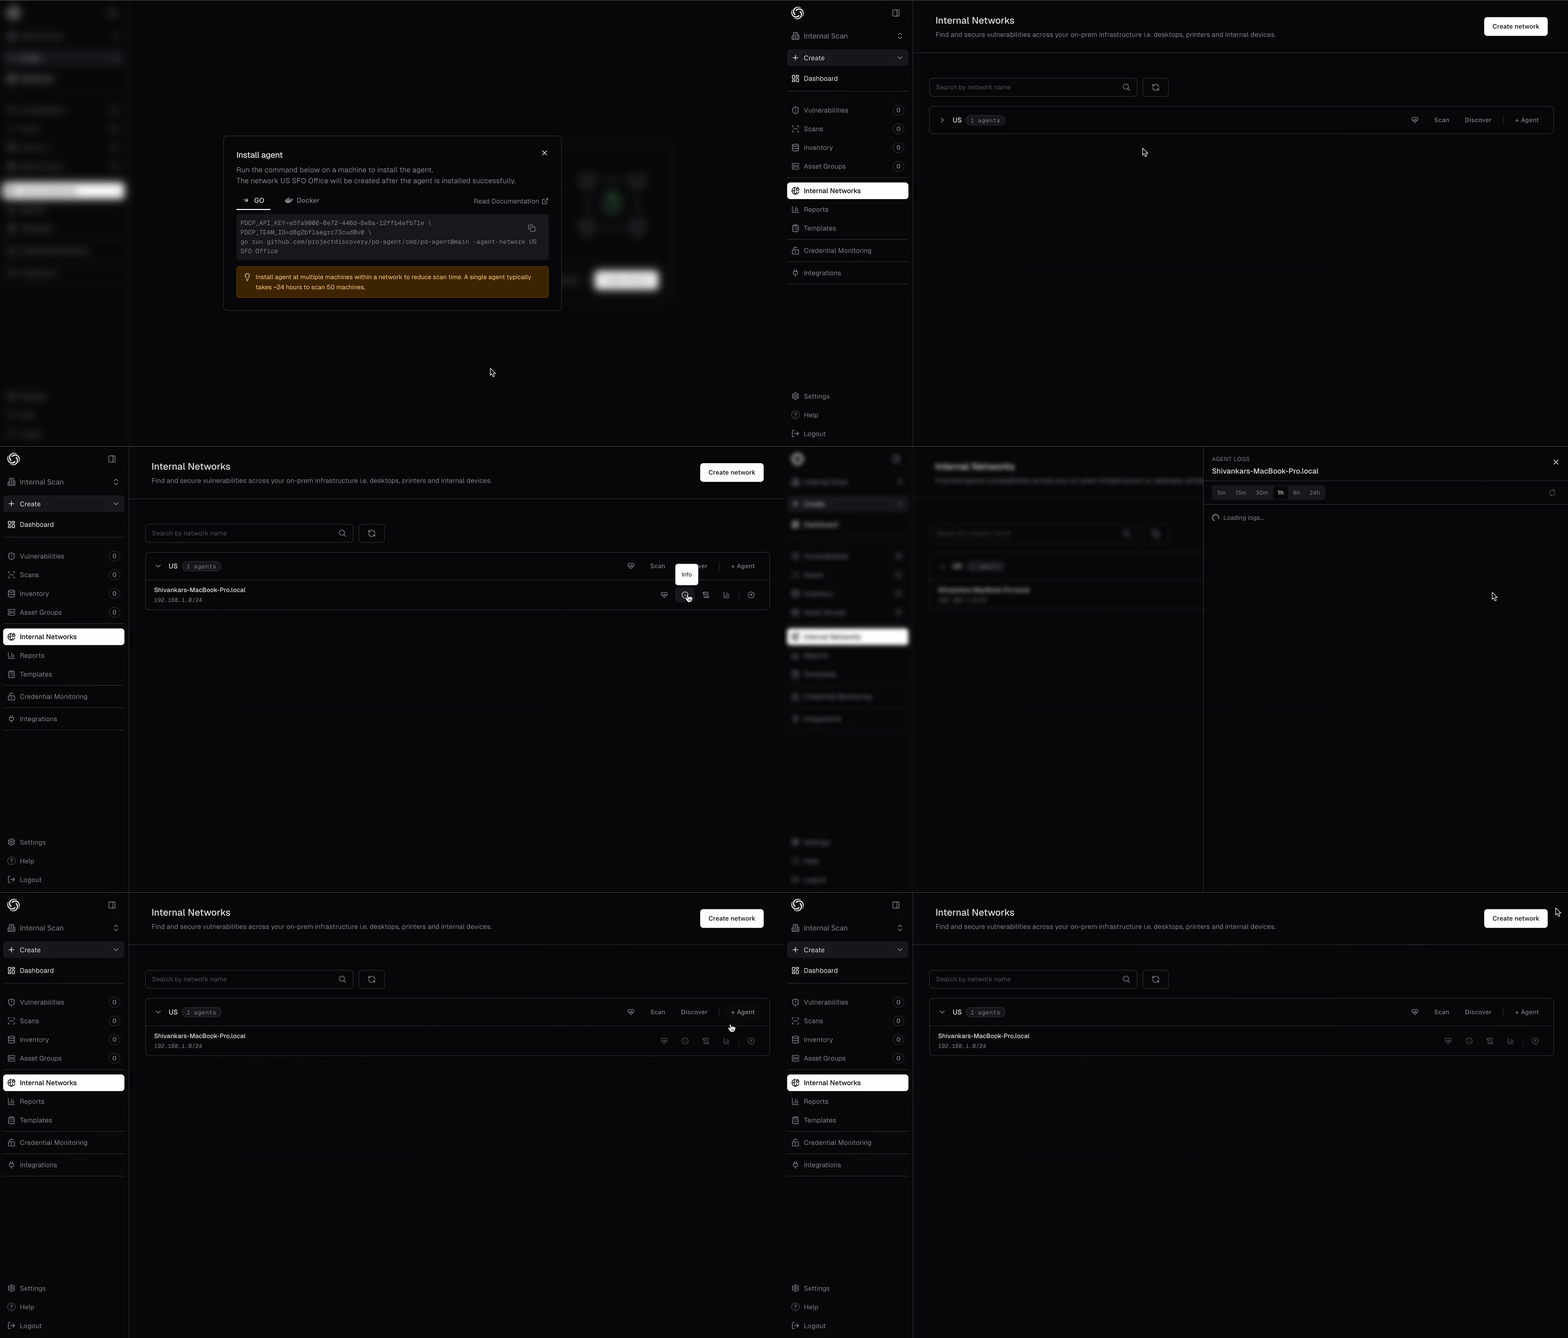
After creating your network, the platform displays a ready-to-run installation command pre-configured with your `PDCP_API_KEY`, `PDCP_TEAM_ID`, and network name. Copy it and run it on a machine inside the network you want to scan.
If you have Go installed, you can run the agent directly:
```bash theme={null}
PDCP_API_KEY=your-api-key PDCP_TEAM_ID=your-team-id \
go run github.com/projectdiscovery/pd-agent/cmd/pd-agent@main \
-agent-network your-network-name
```
* `PDCP_API_KEY` and `PDCP_TEAM_ID` are set as environment variables to authenticate with the platform.
* `-agent-network` is the routing label scans are dispatched to — give each network a distinct name.
The Docker command is the fastest way to get going — no prerequisites beyond Docker itself:
```bash theme={null}
docker run -d --name pd-agent \
--network host --cap-add NET_RAW --cap-add NET_ADMIN \
-e PDCP_API_KEY=your-api-key \
-e PDCP_TEAM_ID=your-team-id \
ghcr.io/projectdiscovery/pd-agent:latest \
-agent-network your-network-name
```
* `--network host` lets the agent see your real network interfaces for subnet discovery.
* `NET_RAW` / `NET_ADMIN` enable naabu SYN scanning; drop them if you only need full-connect scans.
* `-agent-network` is the routing label scans are dispatched to — give each network a distinct name.
Keep your installation command secure - it contains your API key and agent configuration. Anyone with this command can connect an agent to your network.
**Run it as a service for production.** A one-off `docker run` is fine for evaluation, but for a long-lived deployment run pd-agent under a process manager so it survives reboots and crashes. The repo ships ready-made install paths and example manifests:
Docker, Kubernetes, systemd, launchd, and Windows (NSSM) service installs.
Every environment variable and CLI flag the agent accepts.
Once the agent runs successfully, it appears in your network dashboard along with the subnets it discovered on the host, indicating that it's ready to execute scans.
You can create multiple networks for different environments or network segments. Each network can have one or more agents deployed.
### Step 2: Install the agent
After creating your network, the platform displays a ready-to-run installation command pre-configured with your `PDCP_API_KEY`, `PDCP_TEAM_ID`, and network name. Copy it and run it on a machine inside the network you want to scan.
If you have Go installed, you can run the agent directly:
```bash theme={null}
PDCP_API_KEY=your-api-key PDCP_TEAM_ID=your-team-id \
go run github.com/projectdiscovery/pd-agent/cmd/pd-agent@main \
-agent-network your-network-name
```
* `PDCP_API_KEY` and `PDCP_TEAM_ID` are set as environment variables to authenticate with the platform.
* `-agent-network` is the routing label scans are dispatched to — give each network a distinct name.
The Docker command is the fastest way to get going — no prerequisites beyond Docker itself:
```bash theme={null}
docker run -d --name pd-agent \
--network host --cap-add NET_RAW --cap-add NET_ADMIN \
-e PDCP_API_KEY=your-api-key \
-e PDCP_TEAM_ID=your-team-id \
ghcr.io/projectdiscovery/pd-agent:latest \
-agent-network your-network-name
```
* `--network host` lets the agent see your real network interfaces for subnet discovery.
* `NET_RAW` / `NET_ADMIN` enable naabu SYN scanning; drop them if you only need full-connect scans.
* `-agent-network` is the routing label scans are dispatched to — give each network a distinct name.
Keep your installation command secure - it contains your API key and agent configuration. Anyone with this command can connect an agent to your network.
**Run it as a service for production.** A one-off `docker run` is fine for evaluation, but for a long-lived deployment run pd-agent under a process manager so it survives reboots and crashes. The repo ships ready-made install paths and example manifests:
Docker, Kubernetes, systemd, launchd, and Windows (NSSM) service installs.
Every environment variable and CLI flag the agent accepts.
Once the agent runs successfully, it appears in your network dashboard along with the subnets it discovered on the host, indicating that it's ready to execute scans.
 ### Step 3: Discover Assets
Before running vulnerability scans, you can discover assets in your internal network. This helps you identify all hosts, services, and open ports that the agent can reach.
1. Navigate to your networks dashboard at [https://cloud.projectdiscovery.io/internal-network](https://cloud.projectdiscovery.io/internal-network)
2. Locate the network you want to discover assets for and click the **Discover assets** button under the **Action** column
3. Configure your discovery parameters (target ranges, ports, discovery methods, etc.)
4. Click on **Start Discovery** to initiate the discovery process. The pd-agent will scan your internal network and discovered assets will appear in your asset inventory
### Step 3: Discover Assets
Before running vulnerability scans, you can discover assets in your internal network. This helps you identify all hosts, services, and open ports that the agent can reach.
1. Navigate to your networks dashboard at [https://cloud.projectdiscovery.io/internal-network](https://cloud.projectdiscovery.io/internal-network)
2. Locate the network you want to discover assets for and click the **Discover assets** button under the **Action** column
3. Configure your discovery parameters (target ranges, ports, discovery methods, etc.)
4. Click on **Start Discovery** to initiate the discovery process. The pd-agent will scan your internal network and discovered assets will appear in your asset inventory
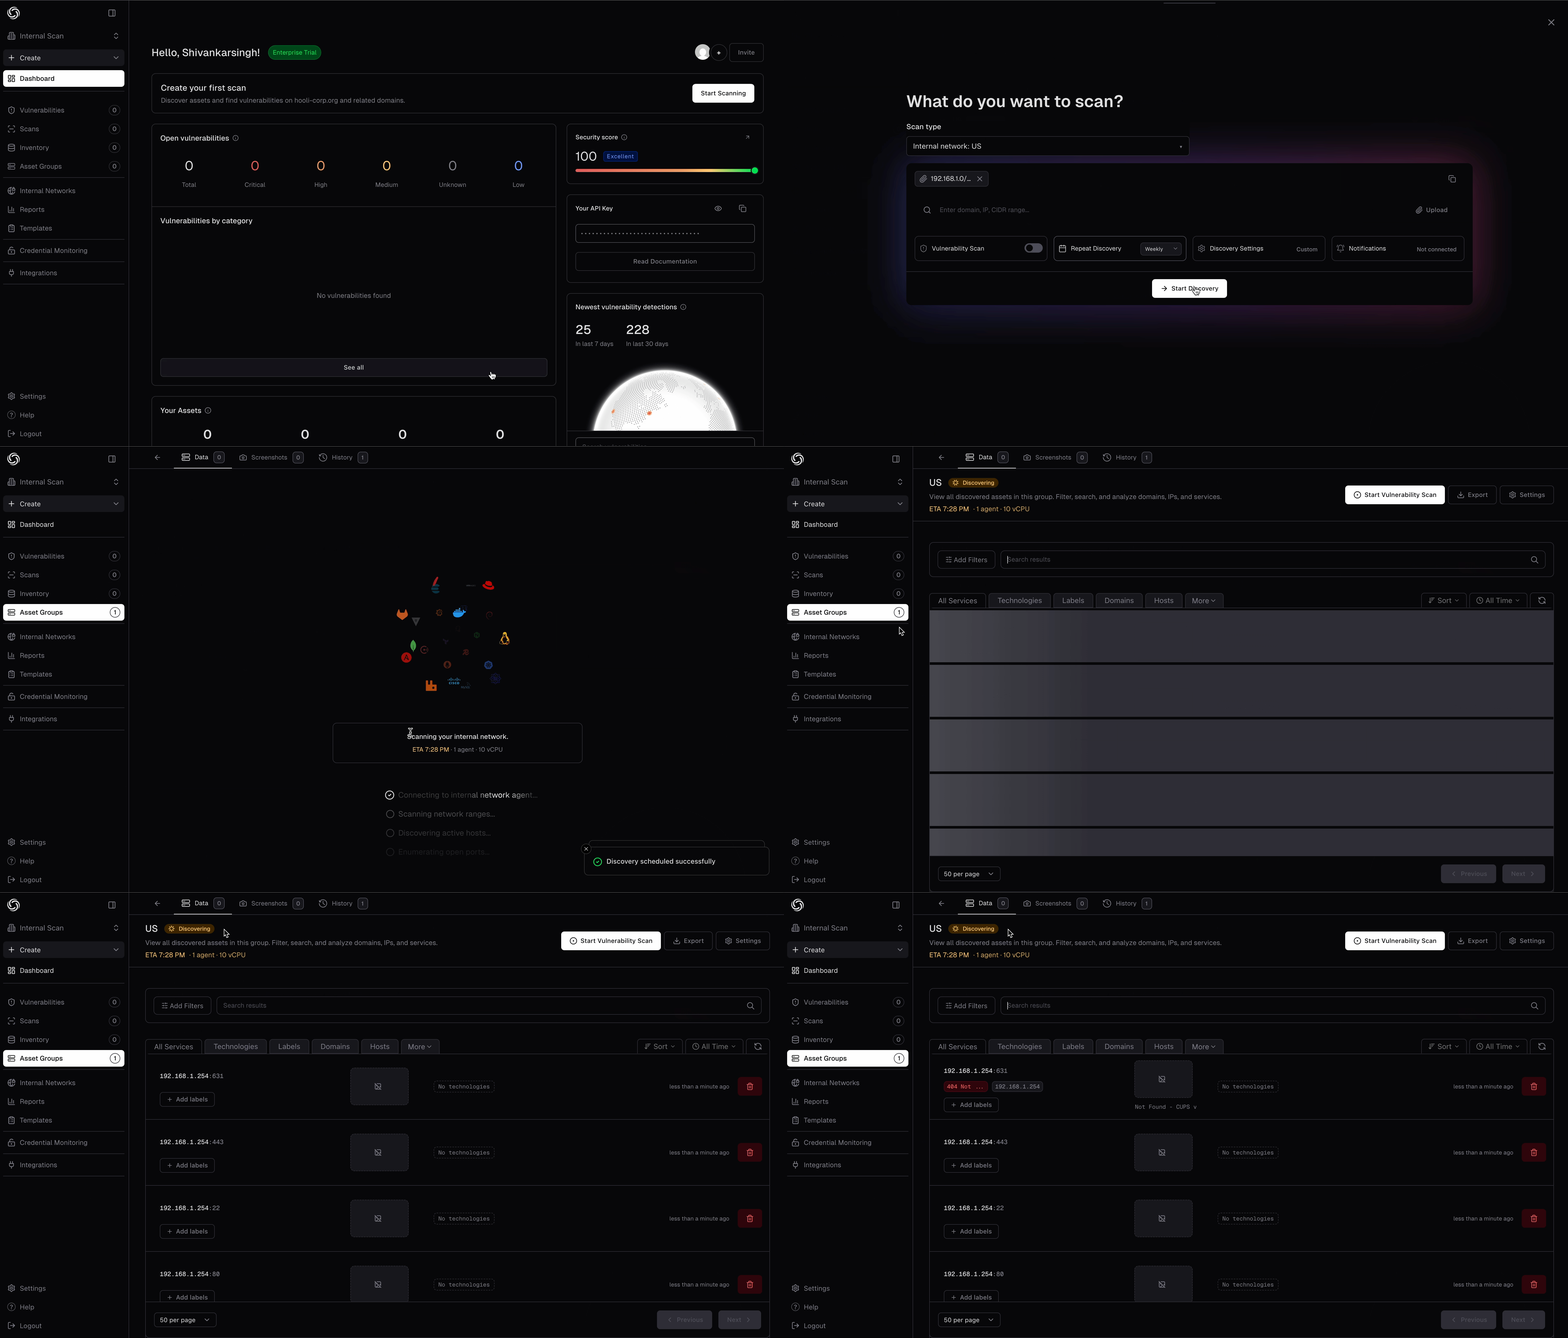 Asset discovery helps you build an accurate inventory of your internal infrastructure before running targeted vulnerability scans. This ensures comprehensive coverage of your attack surface.
### Step 4: Trigger Internal Scans
Once your pd-agent is connected and assets are discovered (optional), you can trigger vulnerability scans. The workflow is identical to external scanning - configure scans through the same interface and view results in the same dashboard.
1. Click on the **Scan** button for the network you want to scan, or go to the **Scans** menu ([https://cloud.projectdiscovery.io/scans](https://cloud.projectdiscovery.io/scans)) and click **Create New Scan**, choose **Internal** followed by the network
2. Select the Asset Group created from the previous discovery operation, or manually enter your targets (internal IPs, hostnames, or CIDR ranges like `192.168.1.0/24`, `internal-server.local`)
3. Select Nuclei templates (CVEs, misconfigurations, vulnerabilities, etc.) and configure scan settings (rate limits, headers, parameters)
4. Click **Create Scan** to start - the agent runs the scan locally using its embedded toolset (nuclei, httpx, naabu, dnsx, tlsx) and streams results back to your dashboard
Asset discovery helps you build an accurate inventory of your internal infrastructure before running targeted vulnerability scans. This ensures comprehensive coverage of your attack surface.
### Step 4: Trigger Internal Scans
Once your pd-agent is connected and assets are discovered (optional), you can trigger vulnerability scans. The workflow is identical to external scanning - configure scans through the same interface and view results in the same dashboard.
1. Click on the **Scan** button for the network you want to scan, or go to the **Scans** menu ([https://cloud.projectdiscovery.io/scans](https://cloud.projectdiscovery.io/scans)) and click **Create New Scan**, choose **Internal** followed by the network
2. Select the Asset Group created from the previous discovery operation, or manually enter your targets (internal IPs, hostnames, or CIDR ranges like `192.168.1.0/24`, `internal-server.local`)
3. Select Nuclei templates (CVEs, misconfigurations, vulnerabilities, etc.) and configure scan settings (rate limits, headers, parameters)
4. Click **Create Scan** to start - the agent runs the scan locally using its embedded toolset (nuclei, httpx, naabu, dnsx, tlsx) and streams results back to your dashboard
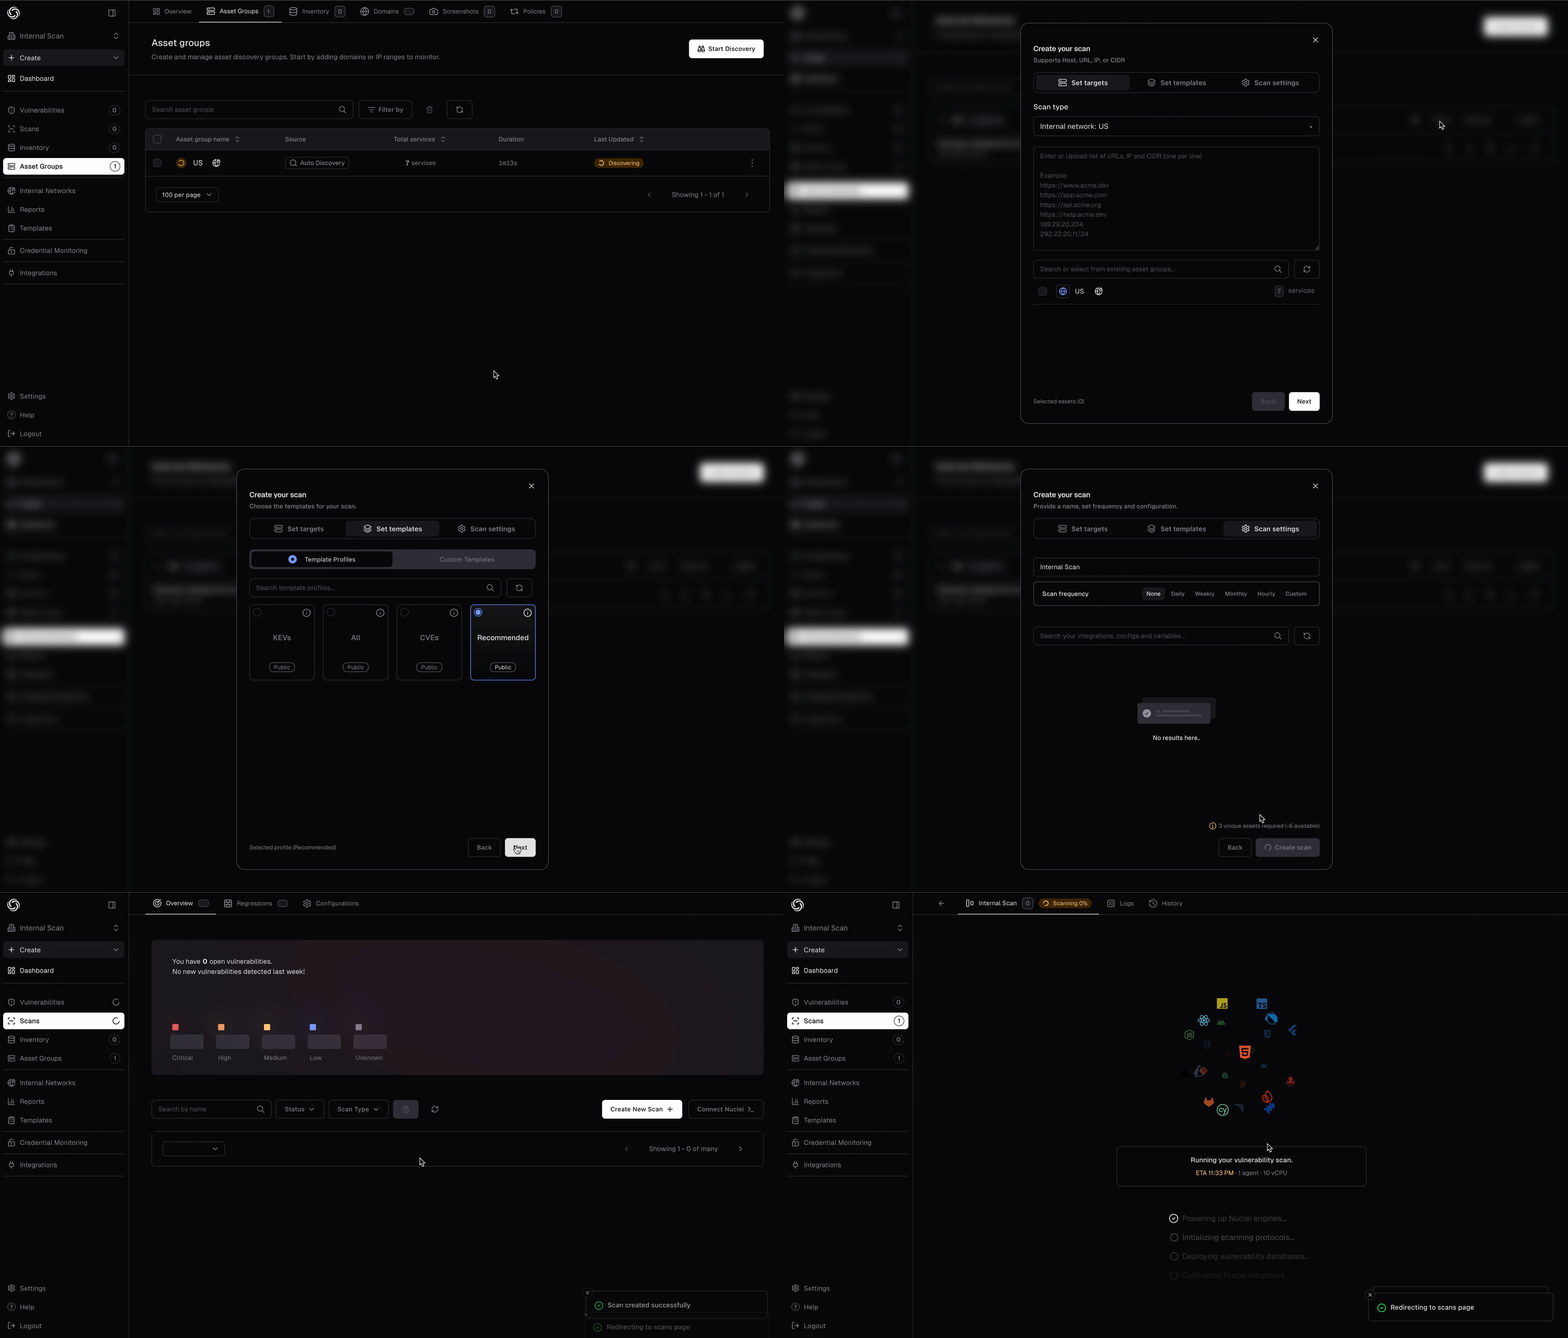 Internal scanning provides the same experience as external scanning - identical template selection, scan configuration, results viewing, retesting capabilities, and integration options.
**Important:** Only input targets that are accessible from where pd-agent is deployed. If the agent is running on a server in your 192.168.1.0/24 network, it can only scan hosts within that network or other networks it has routing access to.
## Method 2: Local Scanning & Upload
This approach lets you run Nuclei locally and upload results to ProjectDiscovery Cloud Platform (ProjectDiscovery).
### Set up your API Key
To connect your existing Nuclei results to PDCP you will need to create a free API Key:
1. Visit [https://cloud.projectdiscovery.io](https://cloud.projectdiscovery.io)
2. Open the setting menu from the top right and select "API Key" to create your API Key
Internal scanning provides the same experience as external scanning - identical template selection, scan configuration, results viewing, retesting capabilities, and integration options.
**Important:** Only input targets that are accessible from where pd-agent is deployed. If the agent is running on a server in your 192.168.1.0/24 network, it can only scan hosts within that network or other networks it has routing access to.
## Method 2: Local Scanning & Upload
This approach lets you run Nuclei locally and upload results to ProjectDiscovery Cloud Platform (ProjectDiscovery).
### Set up your API Key
To connect your existing Nuclei results to PDCP you will need to create a free API Key:
1. Visit [https://cloud.projectdiscovery.io](https://cloud.projectdiscovery.io)
2. Open the setting menu from the top right and select "API Key" to create your API Key
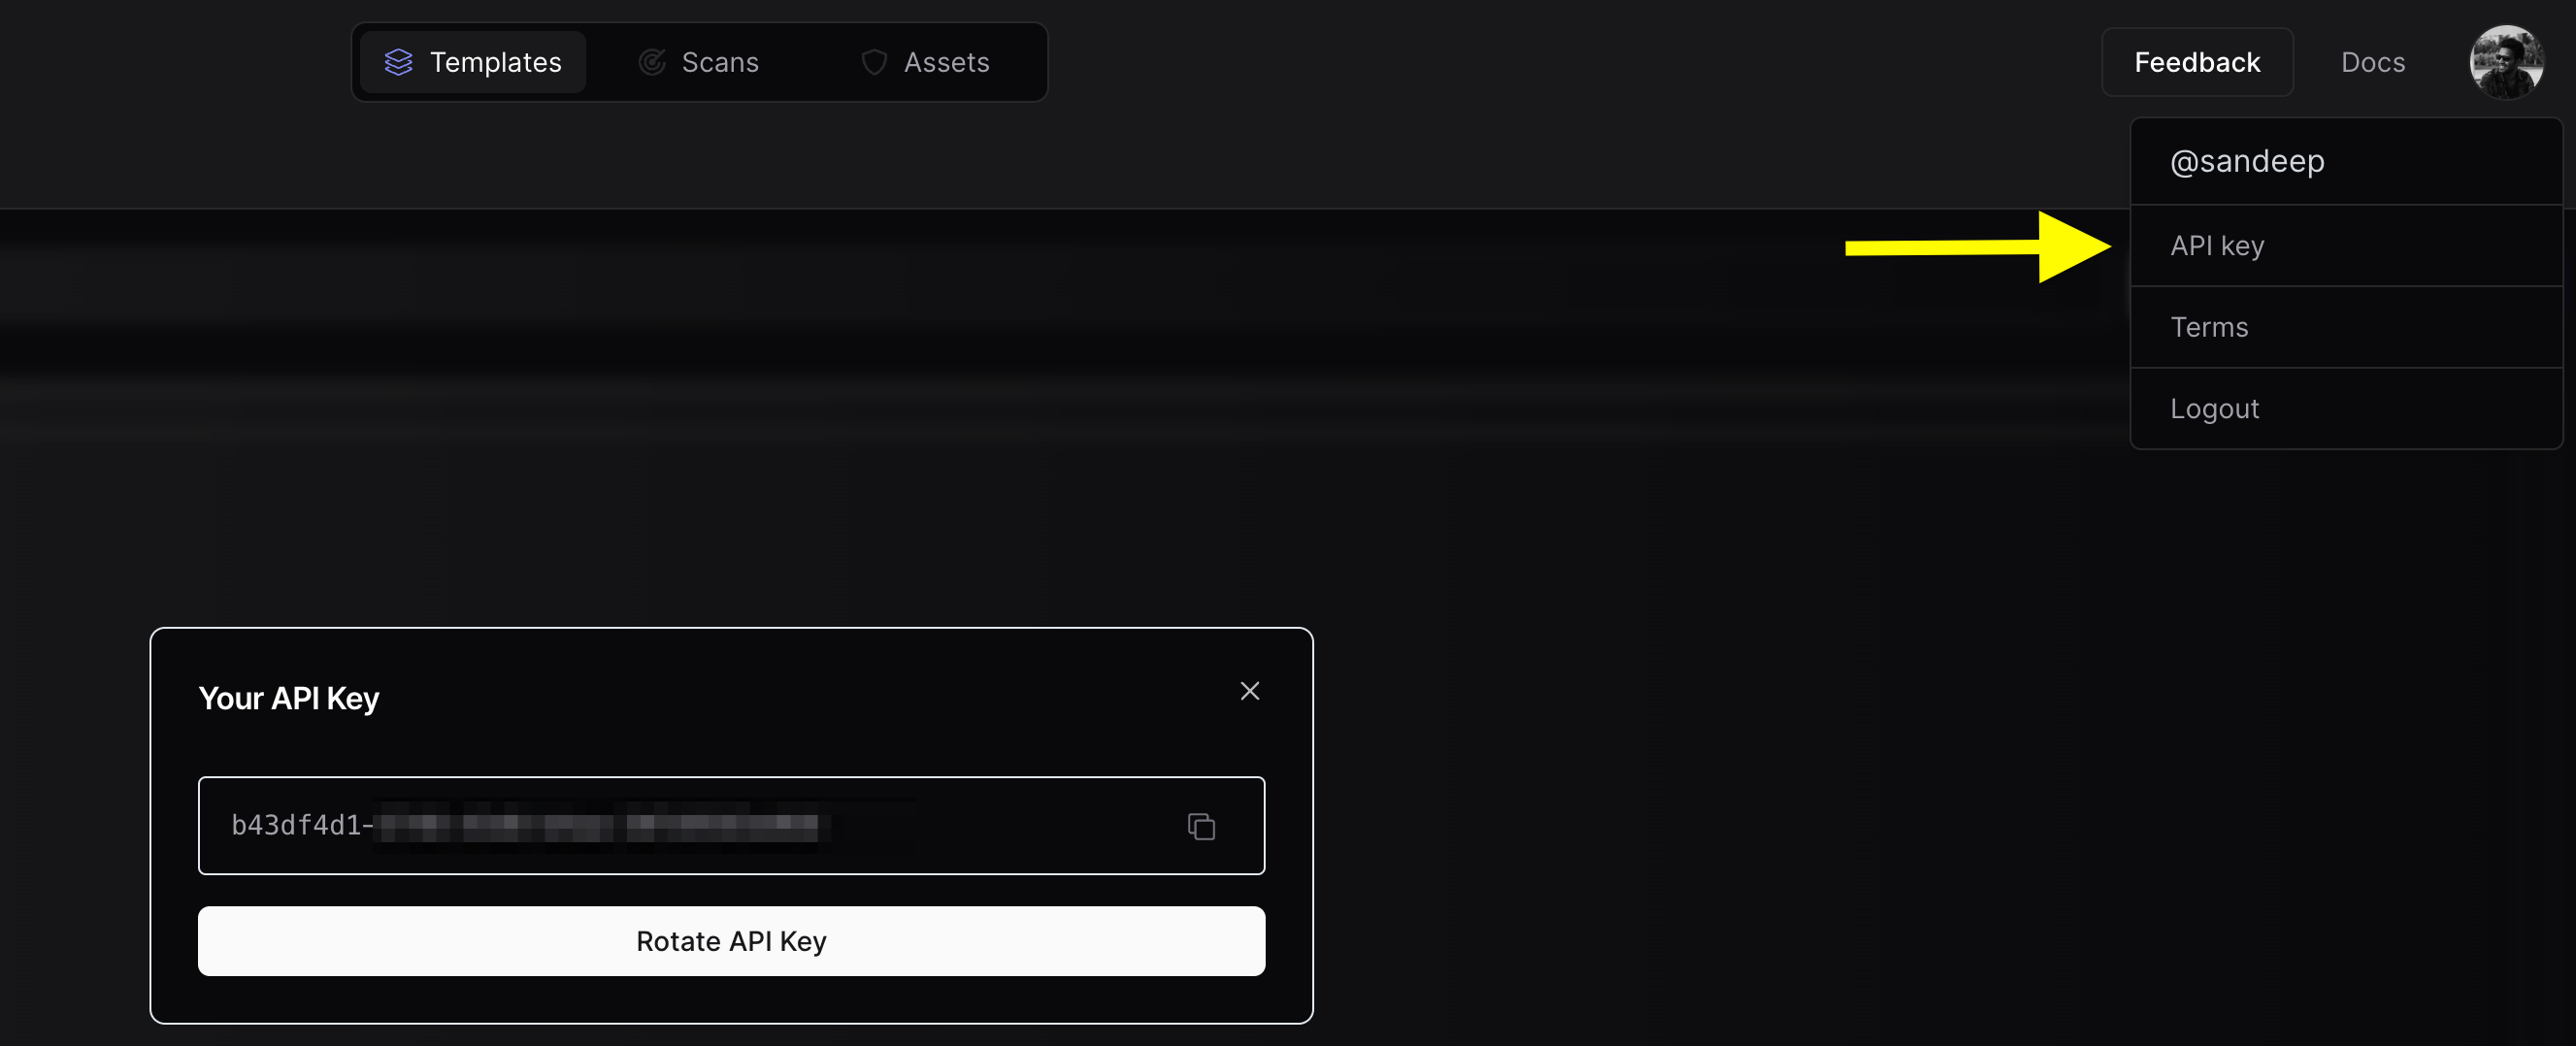 3. Use the `nuclei -auth` command, and enter your API key when prompted.
### Configure Team (Optional)
If you want to upload the scan results to a team workspace instead of your personal workspace, you can configure the Team ID using either method:
* **Obtain Team ID:**
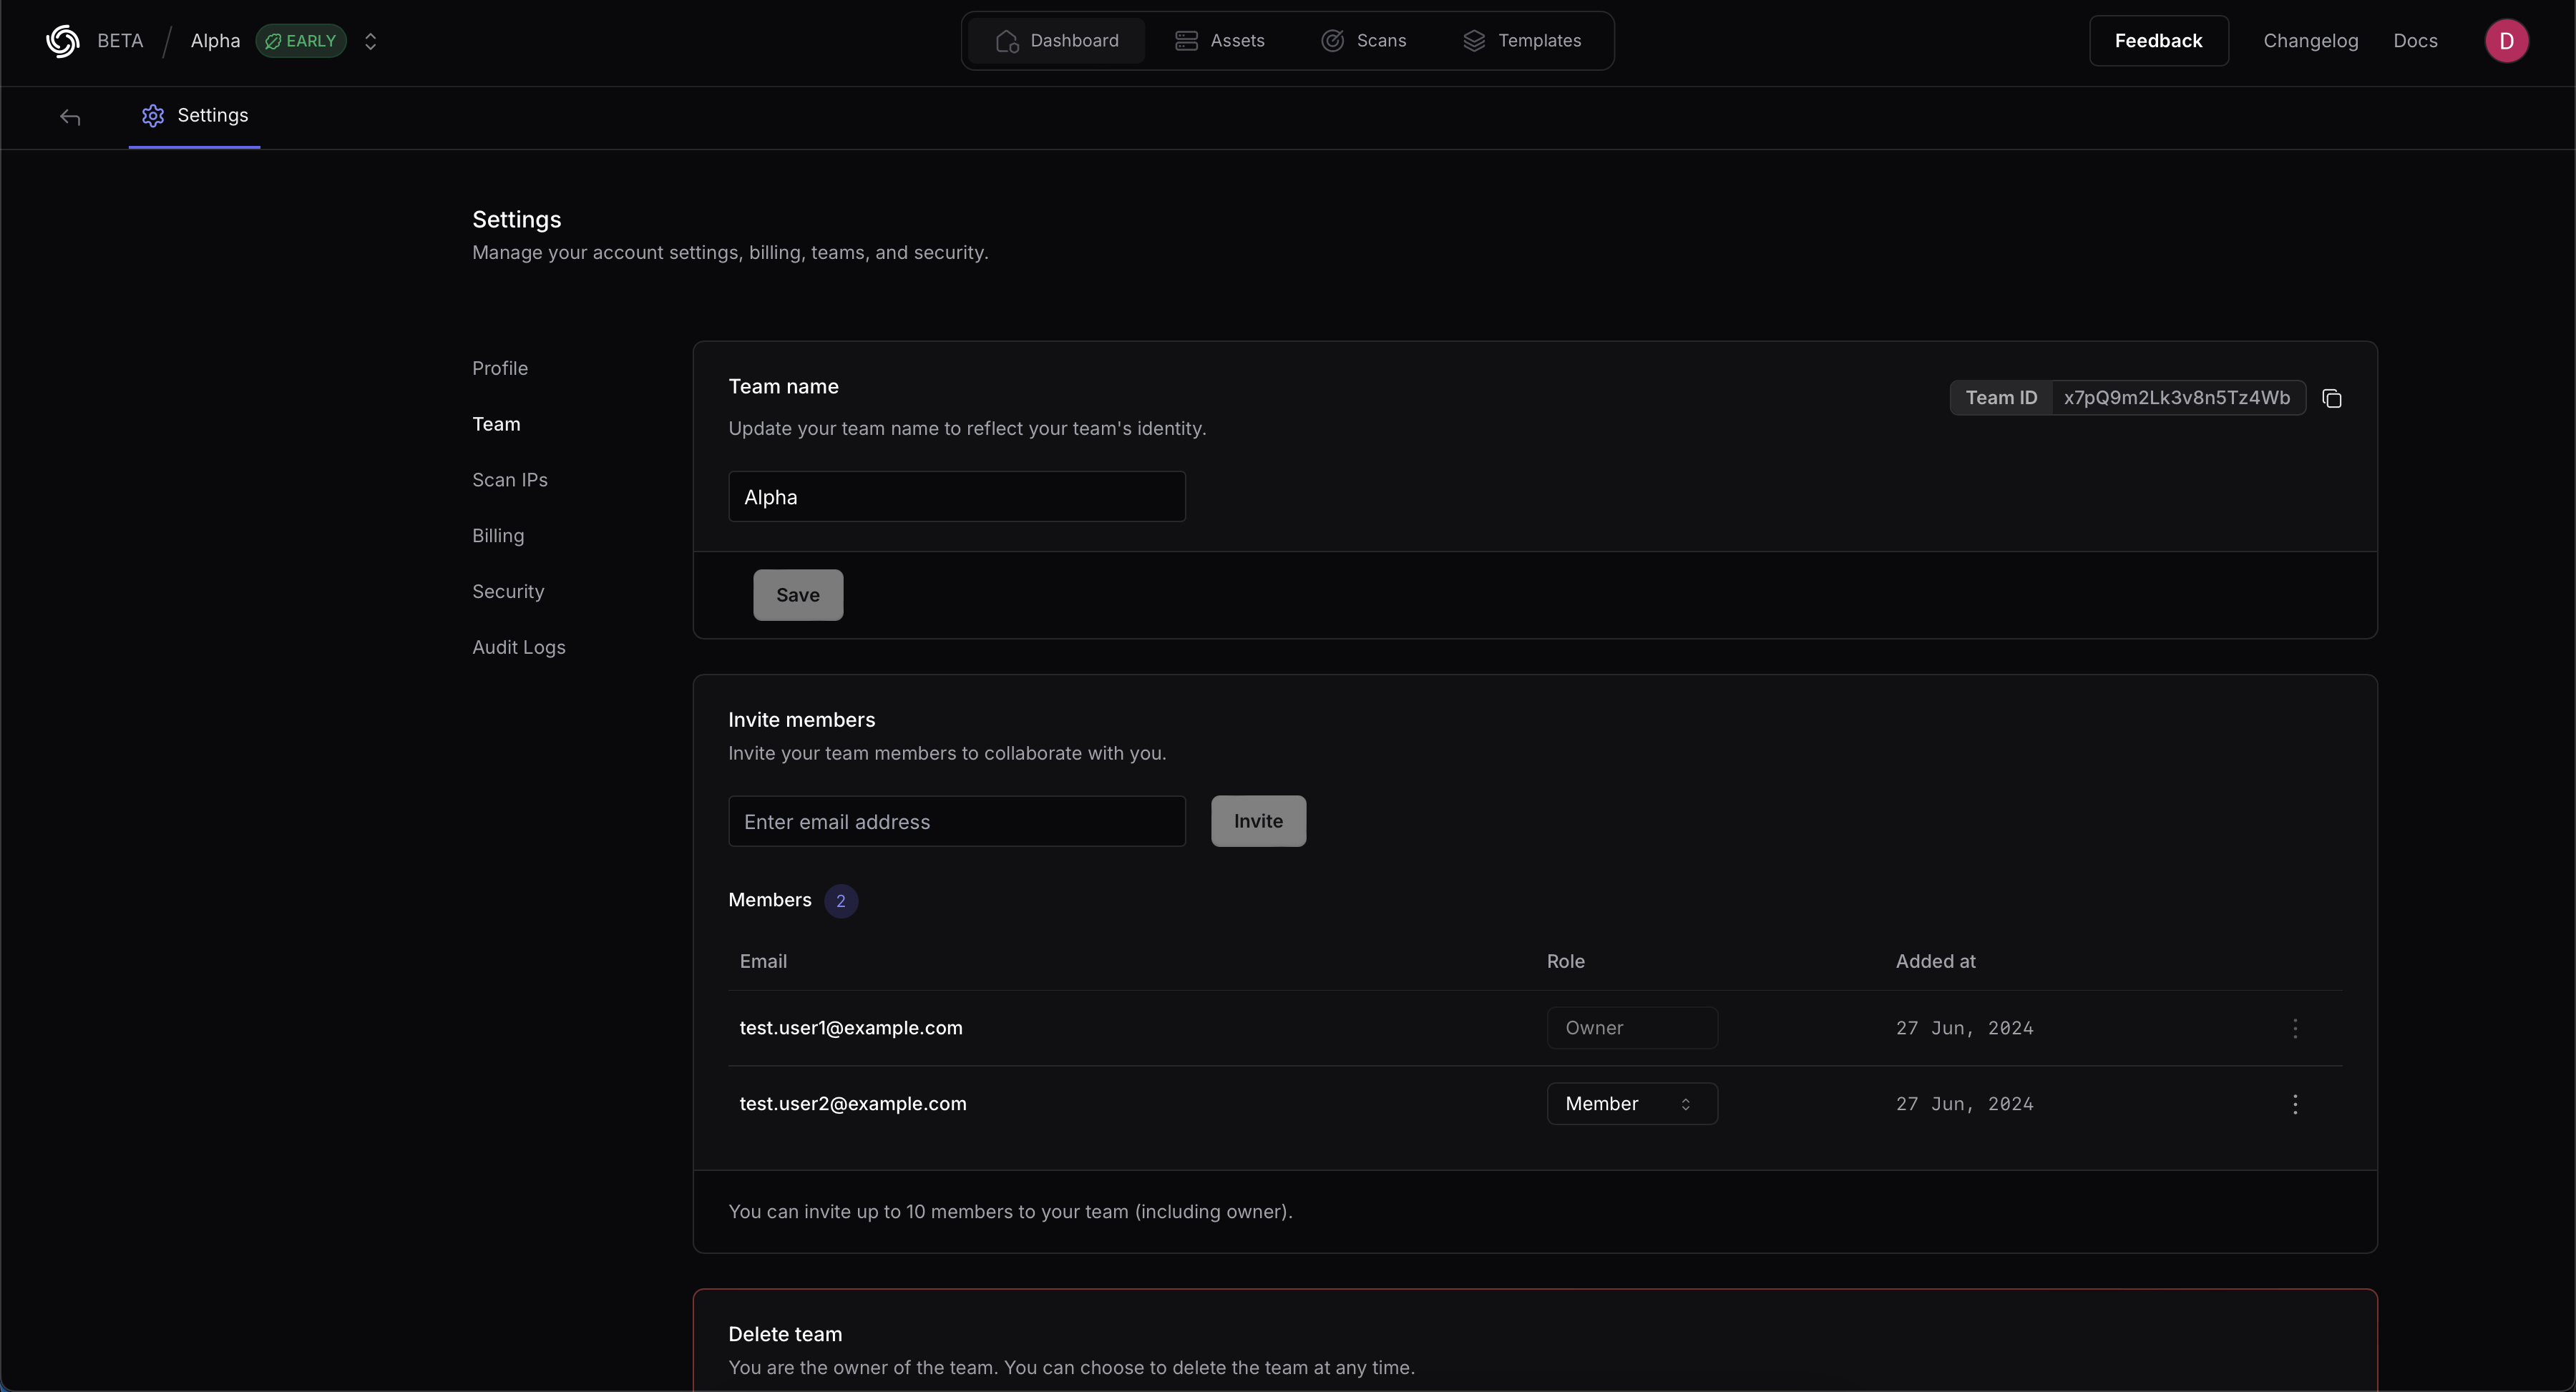
* Navigate to [https://cloud.projectdiscovery.io/settings/team](https://cloud.projectdiscovery.io/settings/team)
* Copy the Team ID from the top right section
3. Use the `nuclei -auth` command, and enter your API key when prompted.
### Configure Team (Optional)
If you want to upload the scan results to a team workspace instead of your personal workspace, you can configure the Team ID using either method:
* **Obtain Team ID:**
* Navigate to [https://cloud.projectdiscovery.io/settings/team](https://cloud.projectdiscovery.io/settings/team)
* Copy the Team ID from the top right section
 * **CLI Option:**
```bash theme={null}
nuclei -tid XXXXXX -cloud-upload
```
* **ENV Variable:**
```bash theme={null}
export PDCP_TEAM_ID=XXXXX
```
2. Run your scan with the upload flag:
```bash theme={null}
# Single target
nuclei -u http://internal-target -cloud-upload
# Multiple targets
nuclei -l internal-hosts.txt -cloud-upload
# With specific templates
nuclei -u http://internal-target -t misconfiguration/ -cloud-upload
```
This method is ideal when you want to maintain complete control over scan execution or integrate with existing automation scripts.
* **CLI Option:**
```bash theme={null}
nuclei -tid XXXXXX -cloud-upload
```
* **ENV Variable:**
```bash theme={null}
export PDCP_TEAM_ID=XXXXX
```
2. Run your scan with the upload flag:
```bash theme={null}
# Single target
nuclei -u http://internal-target -cloud-upload
# Multiple targets
nuclei -l internal-hosts.txt -cloud-upload
# With specific templates
nuclei -u http://internal-target -t misconfiguration/ -cloud-upload
```
This method is ideal when you want to maintain complete control over scan execution or integrate with existing automation scripts.