> ## Documentation Index
> Fetch the complete documentation index at: https://docs.projectdiscovery.io/llms.txt
> Use this file to discover all available pages before exploring further.
# Running httpx
> Learn about running httpx with examples including commands and output
For all of the flags and options available for `httpx` be sure to check out the [Usage](/opensource/httpx/usage) page. On this page we'll share examples running httpx with specific flags and goals
and the output you can expect from each.
If you have questions, reach out to us through [Help](/help).
## Basic Examples
### ASN Fingerprint
Use `httpx` with the `-asn` flag for ASN (Autonomous System Number) fingerprinting, an effective technique for mapping the network affiliations of various domains.
```
subfinder -d hackerone.com -silent | httpx -asn
__ __ __ _ __
/ /_ / /_/ /_____ | |/ /
/ __ \/ __/ __/ __ \| /
/ / / / /_/ /_/ /_/ / |
/_/ /_/\__/\__/ .___/_/|_|
/_/ v1.2.1
projectdiscovery.io
Use with caution. You are responsible for your actions.
Developers assume no liability and are not responsible for any misuse or damage.
https://mta-sts.managed.hackerone.com [AS54113, FASTLY, US]
https://gslink.hackerone.com [AS16509, AMAZON-02, US]
https://www.hackerone.com [AS13335, CLOUDFLARENET, US]
https://mta-sts.forwarding.hackerone.com [AS54113, FASTLY, US]
https://resources.hackerone.com [AS16509, AMAZON-02, US]
https://support.hackerone.com [AS13335, CLOUDFLARENET, US]
https://mta-sts.hackerone.com [AS54113, FASTLY, US]
https://docs.hackerone.com [AS54113, FASTLY, US]
https://api.hackerone.com [AS13335, CLOUDFLARENET, US]
```
### ASN Input
Specify an [autonomous system's number (ASN)](https://en.wikipedia.org/wiki/Autonomous_system_\(Internet\)) and `httpx` will fetch all ip addresses of that autonomous system and probe them
```
echo AS14421 | httpx -silent
https://216.101.17.248
https://216.101.17.249
https://216.101.17.250
https://216.101.17.251
https://216.101.17.252
```
### CIDR Input
Run `httpx` with CIDR input (for example 173.0.84.0/24)
```
echo 173.0.84.0/24 | httpx -silent
https://173.0.84.29
https://173.0.84.43
https://173.0.84.31
https://173.0.84.44
https://173.0.84.12
https://173.0.84.4
https://173.0.84.36
https://173.0.84.45
https://173.0.84.14
https://173.0.84.25
https://173.0.84.46
https://173.0.84.24
https://173.0.84.32
https://173.0.84.9
https://173.0.84.13
https://173.0.84.6
https://173.0.84.16
https://173.0.84.34
```
### Docker Run
Use Docker to run `httpx` in an isolated container. For example, by piping subdomain lists into the Docker container, you can seamlessly perform probing across multiple targets, harnessing the power of `httpx` without direct installation requirements.
```
cat sub_domains.txt | docker run -i projectdiscovery/httpx
__ __ __ _ __
/ /_ / /_/ /_____ | |/ /
/ __ \/ __/ __/ __ \| /
/ / / / /_/ /_/ /_/ / |
/_/ /_/\__/\__/ .___/_/|_|
/_/ v1.1.2
projectdiscovery.io
Use with caution. You are responsible for your actions
Developers assume no liability and are not responsible for any misuse or damage.
https://mta-sts.forwarding.hackerone.com
https://mta-sts.hackerone.com
https://mta-sts.managed.hackerone.com
https://www.hackerone.com
https://api.hackerone.com
https://gslink.hackerone.com
https://resources.hackerone.com
https://docs.hackerone.com
https://support.hackerone.com
```
### Error Page Classifier and Filtering
The Error Page Classifier and Filtering feature aims to add intelligence to `httpx` by enabling `httpx` to classify and filter out common error pages returned by web applications.
It is an enhancement geared towards reducing noise and helping focus on actual results.
Using the `-fep` or `-filter-error-page` option creates a filtered error page in the file `filtered_error_page.json` in jsonline format.
```
httpx -l urls.txt -path /v1/api -fep
__ __ __ _ __
/ /_ / /_/ /_____ | |/ /
/ __ \/ __/ __/ __ \| /
/ / / / /_/ /_/ /_/ / |
/_/ /_/\__/\__/ .___/_/|_|
/_/
projectdiscovery.io
[INF] Current httpx version v1.3.3 (latest)
https://scanme.sh/v1/api
```
### Favicon Hash
Extract and display the mmh3 hash of the '/favicon.ico' file from given targets.
```
subfinder -d hackerone.com -silent | httpx -favicon
__ __ __ _ __
/ /_ / /_/ /_____ | |/ /
/ __ \/ __/ __/ __ \| /
/ / / / /_/ /_/ /_/ / |
/_/ /_/\__/\__/ .___/_/|_|
/_/ v1.1.5
projectdiscovery.io
Use with caution. You are responsible for your actions.
Developers assume no liability and are not responsible for any misuse or damage.
https://docs.hackerone.com/favicon.ico [595148549]
https://hackerone.com/favicon.ico [595148549]
https://mta-sts.managed.hackerone.com/favicon.ico [-1700323260]
https://mta-sts.forwarding.hackerone.com/favicon.ico [-1700323260]
https://support.hackerone.com/favicon.ico [-1279294674]
https://gslink.hackerone.com/favicon.ico [1506877856]
https://resources.hackerone.com/favicon.ico [-1840324437]
https://api.hackerone.com/favicon.ico [566218143]
https://mta-sts.hackerone.com/favicon.ico [-1700323260]
https://www.hackerone.com/favicon.ico [778073381]
```
### File/Path Bruteforce
Use `httpx` with the `-path` option for efficient File/Path Bruteforcing. This feature allows probing specific paths across multiple URLs, uncovering response codes and revealing potentially vulnerable or unsecured endpoints in web applications.
```
httpx -l urls.txt -path /v1/api -sc
__ __ __ _ __
/ /_ / /_/ /_____ | |/ /
/ __ \/ __/ __/ __ \| /
/ / / / /_/ /_/ /_/ / |
/_/ /_/\__/\__/ .___/_/|_|
/_/ v1.1.5
projectdiscovery.io
Use with caution. You are responsible for your actions.
Developers assume no liability and are not responsible for any misuse or damage.
https://mta-sts.managed.hackerone.com/v1/api [404]
https://mta-sts.hackerone.com/v1/api [404]
https://mta-sts.forwarding.hackerone.com/v1/api [404]
https://docs.hackerone.com/v1/api [404]
https://api.hackerone.com/v1/api [401]
https://hackerone.com/v1/api [302]
https://support.hackerone.com/v1/api [404]
https://resources.hackerone.com/v1/api [301]
https://gslink.hackerone.com/v1/api [404]
http://www.hackerone.com/v1/api [301]
```
### File Input
Run `httpx` with the `-probe` flag against all the hosts in hosts.txt to return URLs with probed status.
```
httpx -list hosts.txt -silent -probe
http://ns.hackerone.com [FAILED]
https://docs.hackerone.com [SUCCESS]
https://mta-sts.hackerone.com [SUCCESS]
https://mta-sts.managed.hackerone.com [SUCCESS]
http://email.hackerone.com [FAILED]
https://mta-sts.forwarding.hackerone.com [SUCCESS]
http://links.hackerone.com [FAILED]
https://api.hackerone.com [SUCCESS]
https://www.hackerone.com [SUCCESS]
http://events.hackerone.com [FAILED]
https://support.hackerone.com [SUCCESS]
https://gslink.hackerone.com [SUCCESS]
http://o1.email.hackerone.com [FAILED]
http://info.hackerone.com [FAILED]
https://resources.hackerone.com [SUCCESS]
http://o2.email.hackerone.com [FAILED]
http://o3.email.hackerone.com [FAILED]
http://go.hackerone.com [FAILED]
http://a.ns.hackerone.com [FAILED]
http://b.ns.hackerone.com [FAILED]
```
### JARM Fingerprint
Use `httpx` with the `-jarm` flag to leverage JARM fingerprinting, a specialized tool for active TLS server fingerprinting.
This approach enables the identification and categorization of servers based on their TLS configurations, making it an effective method for detecting and analyzing diverse internet servers,
including potential security threats.
```
subfinder -d hackerone.com -silent | httpx -jarm
__ __ __ _ __
/ /_ / /_/ /_____ | |/ /
/ __ \/ __/ __/ __ \| /
/ / / / /_/ /_/ /_/ / |
/_/ /_/\__/\__/ .___/_/|_|
/_/ v1.2.1
projectdiscovery.io
Use with caution. You are responsible for your actions.
Developers assume no liability and are not responsible for any misuse or damage.
https://www.hackerone.com [29d3dd00029d29d00042d43d00041d5de67cc9954cc85372523050f20b5007]
https://mta-sts.hackerone.com [29d29d00029d29d00042d43d00041d2aa5ce6a70de7ba95aef77a77b00a0af]
https://mta-sts.managed.hackerone.com [29d29d00029d29d00042d43d00041d2aa5ce6a70de7ba95aef77a77b00a0af]
https://docs.hackerone.com [29d29d00029d29d00042d43d00041d2aa5ce6a70de7ba95aef77a77b00a0af]
https://support.hackerone.com [29d3dd00029d29d00029d3dd29d29d5a74e95248e58a6162e37847a24849f7]
https://api.hackerone.com [29d3dd00029d29d00042d43d00041d5de67cc9954cc85372523050f20b5007]
https://mta-sts.forwarding.hackerone.com [29d29d00029d29d00042d43d00041d2aa5ce6a70de7ba95aef77a77b00a0af]
https://resources.hackerone.com [2ad2ad0002ad2ad0002ad2ad2ad2ad043bfbd87c13813505a1b60adf4f6ff5]
```
### Tool Chain
Combining `httpx` with other tools like `subfinder` can elevate your web reconnaissance.
For example, pipe results from `subfinder` directly into 'httpx' to efficiently identify active web servers and their technologies across various subdomains of a given target.
```
subfinder -d hackerone.com -silent| httpx -title -tech-detect -status-code
__ __ __ _ __
/ /_ / /_/ /_____ | |/ /
/ __ \/ __/ __/ __ \| /
/ / / / /_/ /_/ /_/ / |
/_/ /_/\__/\__/ .___/_/|_|
/_/ v1.1.1
projectdiscovery.io
Use with caution. You are responsible for your actions
Developers assume no liability and are not responsible for any misuse or damage.
https://mta-sts.managed.hackerone.com [404] [Page not found · GitHub Pages] [Varnish,GitHub Pages,Ruby on Rails]
https://mta-sts.hackerone.com [404] [Page not found · GitHub Pages] [Varnish,GitHub Pages,Ruby on Rails]
https://mta-sts.forwarding.hackerone.com [404] [Page not found · GitHub Pages] [GitHub Pages,Ruby on Rails,Varnish]
https://docs.hackerone.com [200] [HackerOne Platform Documentation] [Ruby on Rails,jsDelivr,Gatsby,React,webpack,Varnish,GitHub Pages]
https://support.hackerone.com [301,302,301,200] [HackerOne] [Cloudflare,Ruby on Rails,Ruby]
https://resources.hackerone.com [301,301,404] [Sorry, no Folders found.]
```
### URL probe
Run `httpx` against all the hosts and subdomains in hosts.txt to return URLs running an HTTP webserver.
```
cat hosts.txt | httpx
__ __ __ _ __
/ /_ / /_/ /_____ | |/ /
/ __ \/ __/ __/ __ \| /
/ / / / /_/ /_/ /_/ / |
/_/ /_/\__/\__/ .___/_/|_| v1.1.1
/_/
projectdiscovery.io
[WRN] Use with caution. You are responsible for your actions
[WRN] Developers assume no liability and are not responsible for any misuse or damage.
https://mta-sts.managed.hackerone.com
https://mta-sts.hackerone.com
https://mta-sts.forwarding.hackerone.com
https://docs.hackerone.com
https://www.hackerone.com
https://resources.hackerone.com
https://api.hackerone.com
https://support.hackerone.com
```
## UI Dashboard (PDCP Integration)
#### Configure API Key
To upload your assets to PDCP you will need to create a free API Key
* **Obtain API Key:**
* Visit [https://cloud.projectdiscovery.io](https://cloud.projectdiscovery.io)
* Open the setting menu from the top right and select "API Key" to create your API Key
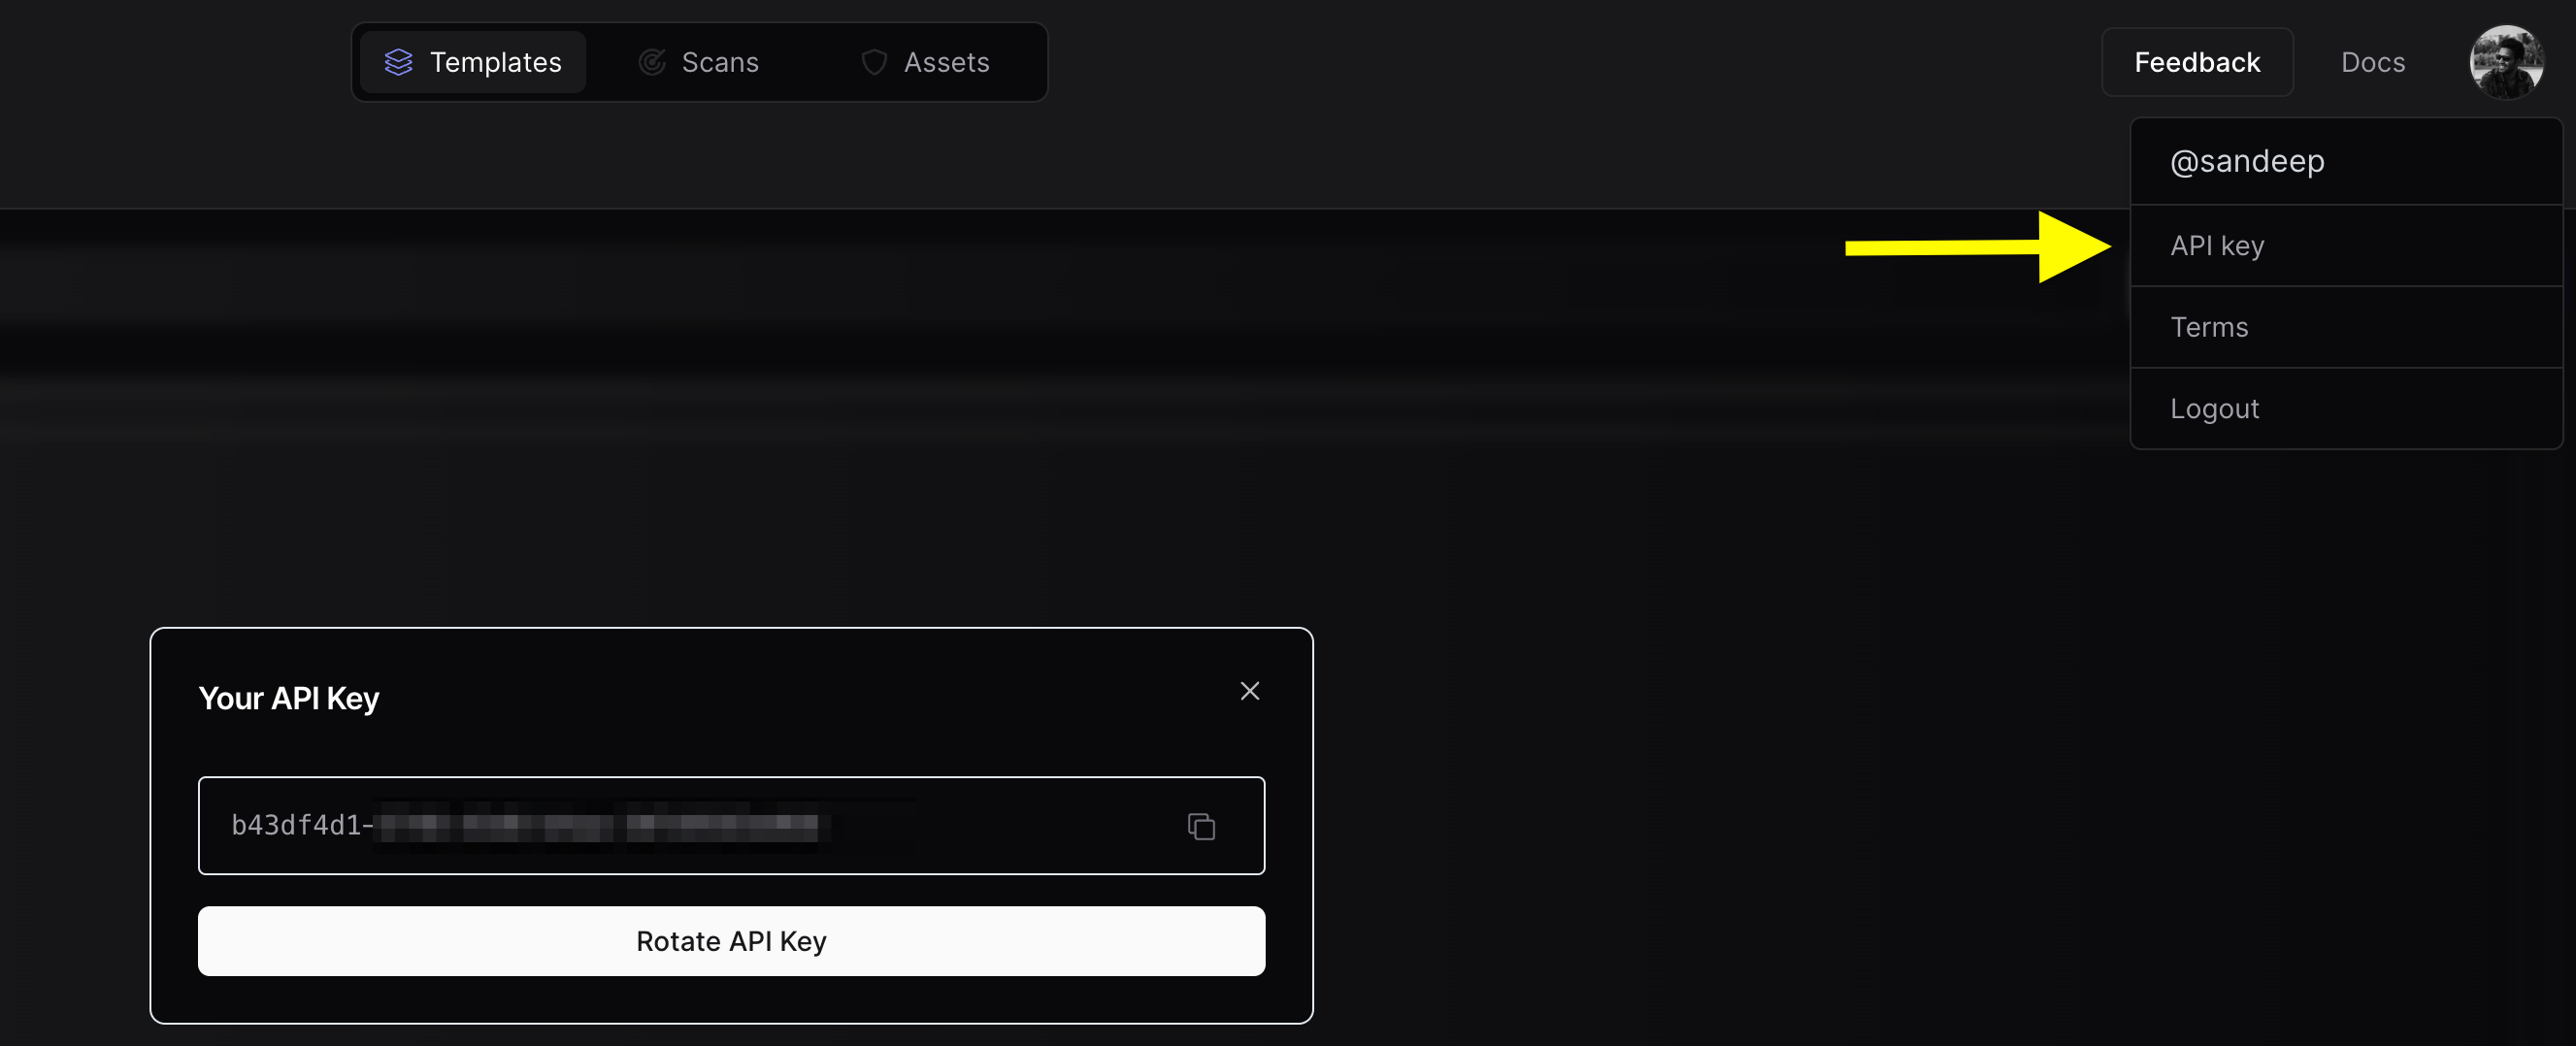 * Use the `httpx -auth` command, and enter your API key when prompted.
#### Configure Team (Optional)
If you want to upload the asset results to a team workspace instead of your personal workspace, you can configure the Team ID. You can use either the CLI option or the environment variable, depending on your preference.
* **Obtain Team ID:**
* To obtain your Team ID, navigate to [https://cloud.projectdiscovery.io/settings/team](https://cloud.projectdiscovery.io/settings/team) and copy the Team ID from the top right section.

* **CLI Option:**
* Use the `-tid` or `-team-id` option to specify the team ID.
* Example: `nuclei -tid XXXXXX -dashboard`
* **ENV Variable:**
* Set the `PDCP_TEAM_ID` environment variable to your team ID.
* Example: `export PDCP_TEAM_ID=XXXXX`
Either of these options is sufficient to configure the Team ID.
#### Run httpx with UI Dashboard
To run `httpx` and upload the results to the UI Dashboard:
```console theme={null}
$ chaos -d hackerone.com | httpx -dashboard
__ __ __ _ __
/ /_ / /_/ /_____ | |/ /
/ __ \/ __/ __/ __ \| /
/ / / / /_/ /_/ /_/ / |
/_/ /_/\__/\__/ .___/_/|_|
/_/
projectdiscovery.io
[INF] Current httpx version v1.6.6 (latest)
[INF] To view results on UI dashboard, visit https://cloud.projectdiscovery.io/assets upon completion.
http://a.ns.hackerone.com
https://www.hackerone.com
http://b.ns.hackerone.com
https://api.hackerone.com
https://mta-sts.forwarding.hackerone.com
https://docs.hackerone.com
https://support.hackerone.com
https://mta-sts.hackerone.com
https://gslink.hackerone.com
[INF] Found 10 results, View found results in dashboard : https://cloud.projectdiscovery.io/assets/cqd56lebh6us73bi22pg
```

#### Uploading to an Existing Asset Group
To upload new assets to an existing asset group:
```console theme={null}
$ chaos -d hackerone.com | httpx -dashboard -aid existing-asset-id
```
#### Setting an Asset Group Name
To set a custom asset group name:
```console theme={null}
$ chaos -d hackerone.com | httpx -dashboard -aname "Custom Asset Group"
```
### Additional upload options
* `-pd, -dashboard`: Enable uploading of `httpx` results to the ProjectDiscovery Cloud (PDCP) UI Dashboard.
* `-aid, -asset-id string`: Upload new assets to an existing asset ID (optional).
* `-aname, -asset-name string`: Set the asset group name (optional).
* `-pdu, -dashboard-upload string`: Upload `httpx` output file (jsonl) to the ProjectDiscovery Cloud (PDCP) UI Dashboard.
### Environment Variables
* `export ENABLE_CLOUD_UPLOAD=true`: Enable dashboard upload by default.
* `export DISABLE_CLOUD_UPLOAD_WARN=true`: Disable dashboard warning.
* `export PDCP_TEAM_ID=XXXXX`: Set the team ID for the ProjectDiscovery Cloud Platform.
## Expanded Examples
### Using httpx as a library
httpx can be used as a library by creating an instance of the Option struct and populating it with the same options that would be specified via CLI.
Once validated, the struct should be passed to a runner instance (to be closed at the end of the program) and the RunEnumeration method should be called.
* A basic example of how to use httpx as a library is available in the [GitHub examples](https://github.com/projectdiscovery/httpx/tree/main/examples) folder.
### Using httpx screenshot
Httpx includes support for taking a screenshot with `-screenshot` that gives users the ability to take screenshots of target URLs, pages, or endpoints along with the rendered DOM.
This functionality enables a comprehensive view of the target's visual content.
Rendered DOM body is also included in json line output when `-screenshot` option is used with `-json` option.
To use this feature, add the `-screenshot` flag to the `httpx` command.
`httpx -screenshot -u https://example.com`
Screenshots are captured using a headless browser, and as a result `httpx` will be slower when using the `-screenshot` option.
#### Domain, Subdomain, and Path Support
The `-screenshot` option is versatile and can be used to capture screenshots for domains, subdomains, and even specific paths when used in conjunction with the `-path` option:
```
httpx -screenshot -u example.com
httpx -screenshot -u https://example.com/login
httpx -screenshot -path fuzz_path.txt -u https://example.com
```
#### Using with Other Tools
In the example below we're providing subfinder output to the `httpx` screenshot.
```
subfinder -d example.com | httpx -screenshot
```
#### System Chrome Support
By default, `httpx` uses the go-rod library to install and manage Chrome for taking screenshots.
However, if you prefer to use your locally installed system Chrome, add the `-system-chrome` flag:
```
httpx -screenshot -system-chrome -u https://example.com
```
#### Output Directory
Screenshots are stored in the output/screenshot directory by default. To specify a custom output directory, use the `-srd` option:
```
httpx -screenshot -srd /path/to/custom/directory -u https://example.com
```
#### Body Preview
Body preview shows first N characters of response. And strip html tags in response.
```
httpx -u https://example.com -silent -body-preview
https://example.com [Example Domain This domain is for use in illustrative examples in documents. You may use this domai]
```
```
httpx -u https://example.com -silent -body-preview=200 -strip=html
https://example.com [Example Domain This domain is for use in illustrative examples in documents. You may use this domain in literature without prior coordination or asking for permission. More information...]
```
* Use the `httpx -auth` command, and enter your API key when prompted.
#### Configure Team (Optional)
If you want to upload the asset results to a team workspace instead of your personal workspace, you can configure the Team ID. You can use either the CLI option or the environment variable, depending on your preference.
* **Obtain Team ID:**
* To obtain your Team ID, navigate to [https://cloud.projectdiscovery.io/settings/team](https://cloud.projectdiscovery.io/settings/team) and copy the Team ID from the top right section.

* **CLI Option:**
* Use the `-tid` or `-team-id` option to specify the team ID.
* Example: `nuclei -tid XXXXXX -dashboard`
* **ENV Variable:**
* Set the `PDCP_TEAM_ID` environment variable to your team ID.
* Example: `export PDCP_TEAM_ID=XXXXX`
Either of these options is sufficient to configure the Team ID.
#### Run httpx with UI Dashboard
To run `httpx` and upload the results to the UI Dashboard:
```console theme={null}
$ chaos -d hackerone.com | httpx -dashboard
__ __ __ _ __
/ /_ / /_/ /_____ | |/ /
/ __ \/ __/ __/ __ \| /
/ / / / /_/ /_/ /_/ / |
/_/ /_/\__/\__/ .___/_/|_|
/_/
projectdiscovery.io
[INF] Current httpx version v1.6.6 (latest)
[INF] To view results on UI dashboard, visit https://cloud.projectdiscovery.io/assets upon completion.
http://a.ns.hackerone.com
https://www.hackerone.com
http://b.ns.hackerone.com
https://api.hackerone.com
https://mta-sts.forwarding.hackerone.com
https://docs.hackerone.com
https://support.hackerone.com
https://mta-sts.hackerone.com
https://gslink.hackerone.com
[INF] Found 10 results, View found results in dashboard : https://cloud.projectdiscovery.io/assets/cqd56lebh6us73bi22pg
```

#### Uploading to an Existing Asset Group
To upload new assets to an existing asset group:
```console theme={null}
$ chaos -d hackerone.com | httpx -dashboard -aid existing-asset-id
```
#### Setting an Asset Group Name
To set a custom asset group name:
```console theme={null}
$ chaos -d hackerone.com | httpx -dashboard -aname "Custom Asset Group"
```
### Additional upload options
* `-pd, -dashboard`: Enable uploading of `httpx` results to the ProjectDiscovery Cloud (PDCP) UI Dashboard.
* `-aid, -asset-id string`: Upload new assets to an existing asset ID (optional).
* `-aname, -asset-name string`: Set the asset group name (optional).
* `-pdu, -dashboard-upload string`: Upload `httpx` output file (jsonl) to the ProjectDiscovery Cloud (PDCP) UI Dashboard.
### Environment Variables
* `export ENABLE_CLOUD_UPLOAD=true`: Enable dashboard upload by default.
* `export DISABLE_CLOUD_UPLOAD_WARN=true`: Disable dashboard warning.
* `export PDCP_TEAM_ID=XXXXX`: Set the team ID for the ProjectDiscovery Cloud Platform.
## Expanded Examples
### Using httpx as a library
httpx can be used as a library by creating an instance of the Option struct and populating it with the same options that would be specified via CLI.
Once validated, the struct should be passed to a runner instance (to be closed at the end of the program) and the RunEnumeration method should be called.
* A basic example of how to use httpx as a library is available in the [GitHub examples](https://github.com/projectdiscovery/httpx/tree/main/examples) folder.
### Using httpx screenshot
Httpx includes support for taking a screenshot with `-screenshot` that gives users the ability to take screenshots of target URLs, pages, or endpoints along with the rendered DOM.
This functionality enables a comprehensive view of the target's visual content.
Rendered DOM body is also included in json line output when `-screenshot` option is used with `-json` option.
To use this feature, add the `-screenshot` flag to the `httpx` command.
`httpx -screenshot -u https://example.com`
Screenshots are captured using a headless browser, and as a result `httpx` will be slower when using the `-screenshot` option.
#### Domain, Subdomain, and Path Support
The `-screenshot` option is versatile and can be used to capture screenshots for domains, subdomains, and even specific paths when used in conjunction with the `-path` option:
```
httpx -screenshot -u example.com
httpx -screenshot -u https://example.com/login
httpx -screenshot -path fuzz_path.txt -u https://example.com
```
#### Using with Other Tools
In the example below we're providing subfinder output to the `httpx` screenshot.
```
subfinder -d example.com | httpx -screenshot
```
#### System Chrome Support
By default, `httpx` uses the go-rod library to install and manage Chrome for taking screenshots.
However, if you prefer to use your locally installed system Chrome, add the `-system-chrome` flag:
```
httpx -screenshot -system-chrome -u https://example.com
```
#### Output Directory
Screenshots are stored in the output/screenshot directory by default. To specify a custom output directory, use the `-srd` option:
```
httpx -screenshot -srd /path/to/custom/directory -u https://example.com
```
#### Body Preview
Body preview shows first N characters of response. And strip html tags in response.
```
httpx -u https://example.com -silent -body-preview
https://example.com [Example Domain This domain is for use in illustrative examples in documents. You may use this domai]
```
```
httpx -u https://example.com -silent -body-preview=200 -strip=html
https://example.com [Example Domain This domain is for use in illustrative examples in documents. You may use this domain in literature without prior coordination or asking for permission. More information...]
```