Slack
MS Teams
Webhook
Jira
GitHub
GitLab
Linear
AWS
GCP
Azure
Alibaba
Kubernetes
Cloudflare
Fastly
DigitalOcean
Notification Integrations
Alerting integrations support notifications as part of scanning and asset discovery, and include Slack, Microsoft Teams, Email, and custom Webhooks. Navigate to Scans → Configurations → Alerting to configure your alerts.
Slack
ProjectDiscovery supports scan notifications through Slack. To enable Slack notifications provide a name for your Configuration, a webhook, and an optional username. Choose from the list of Events (Scan Started, Scan Finished, Scan Failed) to specify what notifications are generated. All Events are selected by default- Refer to Slack’s documentation on creating webhooks for configuration details.
MS Teams
ProjectDiscovery supports notifications through Microsoft Teams. To enable notifications, provide a name for your Configuration and a corresponding webhook. Choose from the list of Events (Scan Started, Scan Finished, Scan Failed) to specify what notifications are generated.- Refer to Microsoft’s documentation on creating webhooks for configuration details.
Webhook
ProjectDiscovery supports custom webhook notifications, allowing you to post events to any HTTP endpoint that matches your infrastructure requirements.Quick Setup
- Navigate to Scans → Configurations → Alerting
- Select “Webhook” integration
- Provide your endpoint URL and optional authentication
- Choose which events to receive (New Asset, New Vulnerability, Scan/Asset Finished/Failed)
- Select severity filters (optional)
string
required
A descriptive name for your webhook configuration
string
required
Your HTTPS endpoint that will receive POST requestsExample:
https://your-domain.com/api/security/alertsEvent Types Overview
ProjectDiscovery sends webhook notifications as HTTP POST requests withContent-Type: application/json. Each scan or enumeration job triggers multiple webhooks throughout its lifecycle.
Scan Events
Track vulnerability scan lifecycle from start to completion
Discovery Events
Monitor asset discovery operations in real-time
New Vulnerability
Alerts when new vulnerabilities are found (rescans only)
New Asset
Alerts when new assets are discovered in your attack surface
Webhook Payload Reference
- Scan Events
- Discovery Events
- New Asset / Vulnerability Events
Select a scan event to view its webhook payload structure:
Scan Started
Scan Started
Trigger: Immediately when a vulnerability scan begins executionType:
runningScan Started Payload
Field Definitions
Field Definitions
Root Fields:
type— Always"running"for this eventmessage— Human-readable status messagescan_name— Name of the scan configurationscan_id— Unique identifier for this scan execution
started_at— ISO 8601 timestamp when scan startedtotal_targets— Number of targets to scan (integer)total_templates— Number of templates being used (integer)total_requests— Estimated total HTTP requests (integer)
Scan Finished
Scan Finished
Trigger: When a vulnerability scan completes successfullyType:
finishedScan Finished Payload
Field Definitions
Field Definitions
Root Fields:
type— Always"finished"for this eventmessage— Human-readable status messagescan_name— Name of the scan configurationscan_id— Unique identifier for this scan execution
finished_at— ISO 8601 timestamp when scan completedscan_time— Total duration in seconds (e.g., “4500s”)total_matches— Total vulnerabilities found (integer)severity_breakdown— Count by severity level (object)critical— Critical severity counthigh— High severity countmedium— Medium severity countlow— Low severity countinfo— Info severity count
rescan_new_vulnerabilities— New vulns since last scan, rescans only (integer)rescan_vulns_list— List of new vulnerabilities, max 15 items, rescans only (array)Name— Vulnerability name/titleSeverity— Severity level (critical, high, medium, low, info)Count— Number of instances found
Scan Failed
Scan Failed
Trigger: When a scan fails or is manually stoppedType:
failed_stoppedScan Failed Payload
Field Definitions
Field Definitions
Root Fields:
type— Always"failed_stopped"for this eventmessage— Human-readable status messagescan_name— Name of the scan configurationscan_id— Unique identifier for this scan execution
timestamp— ISO 8601 timestamp when failure occurredprogress— Completion percentage (0-100) when failed (integer)failure_reason— Description of why scan failed or was stopped (string)
Ticketing Integrations
The integrations under Ticketing support ticketing functionality as part of scanning and include support for Jira, GitHub, GitLab, and Linear. Navigate to Scans → Configurations → Ticketing to configure your ticketing tools.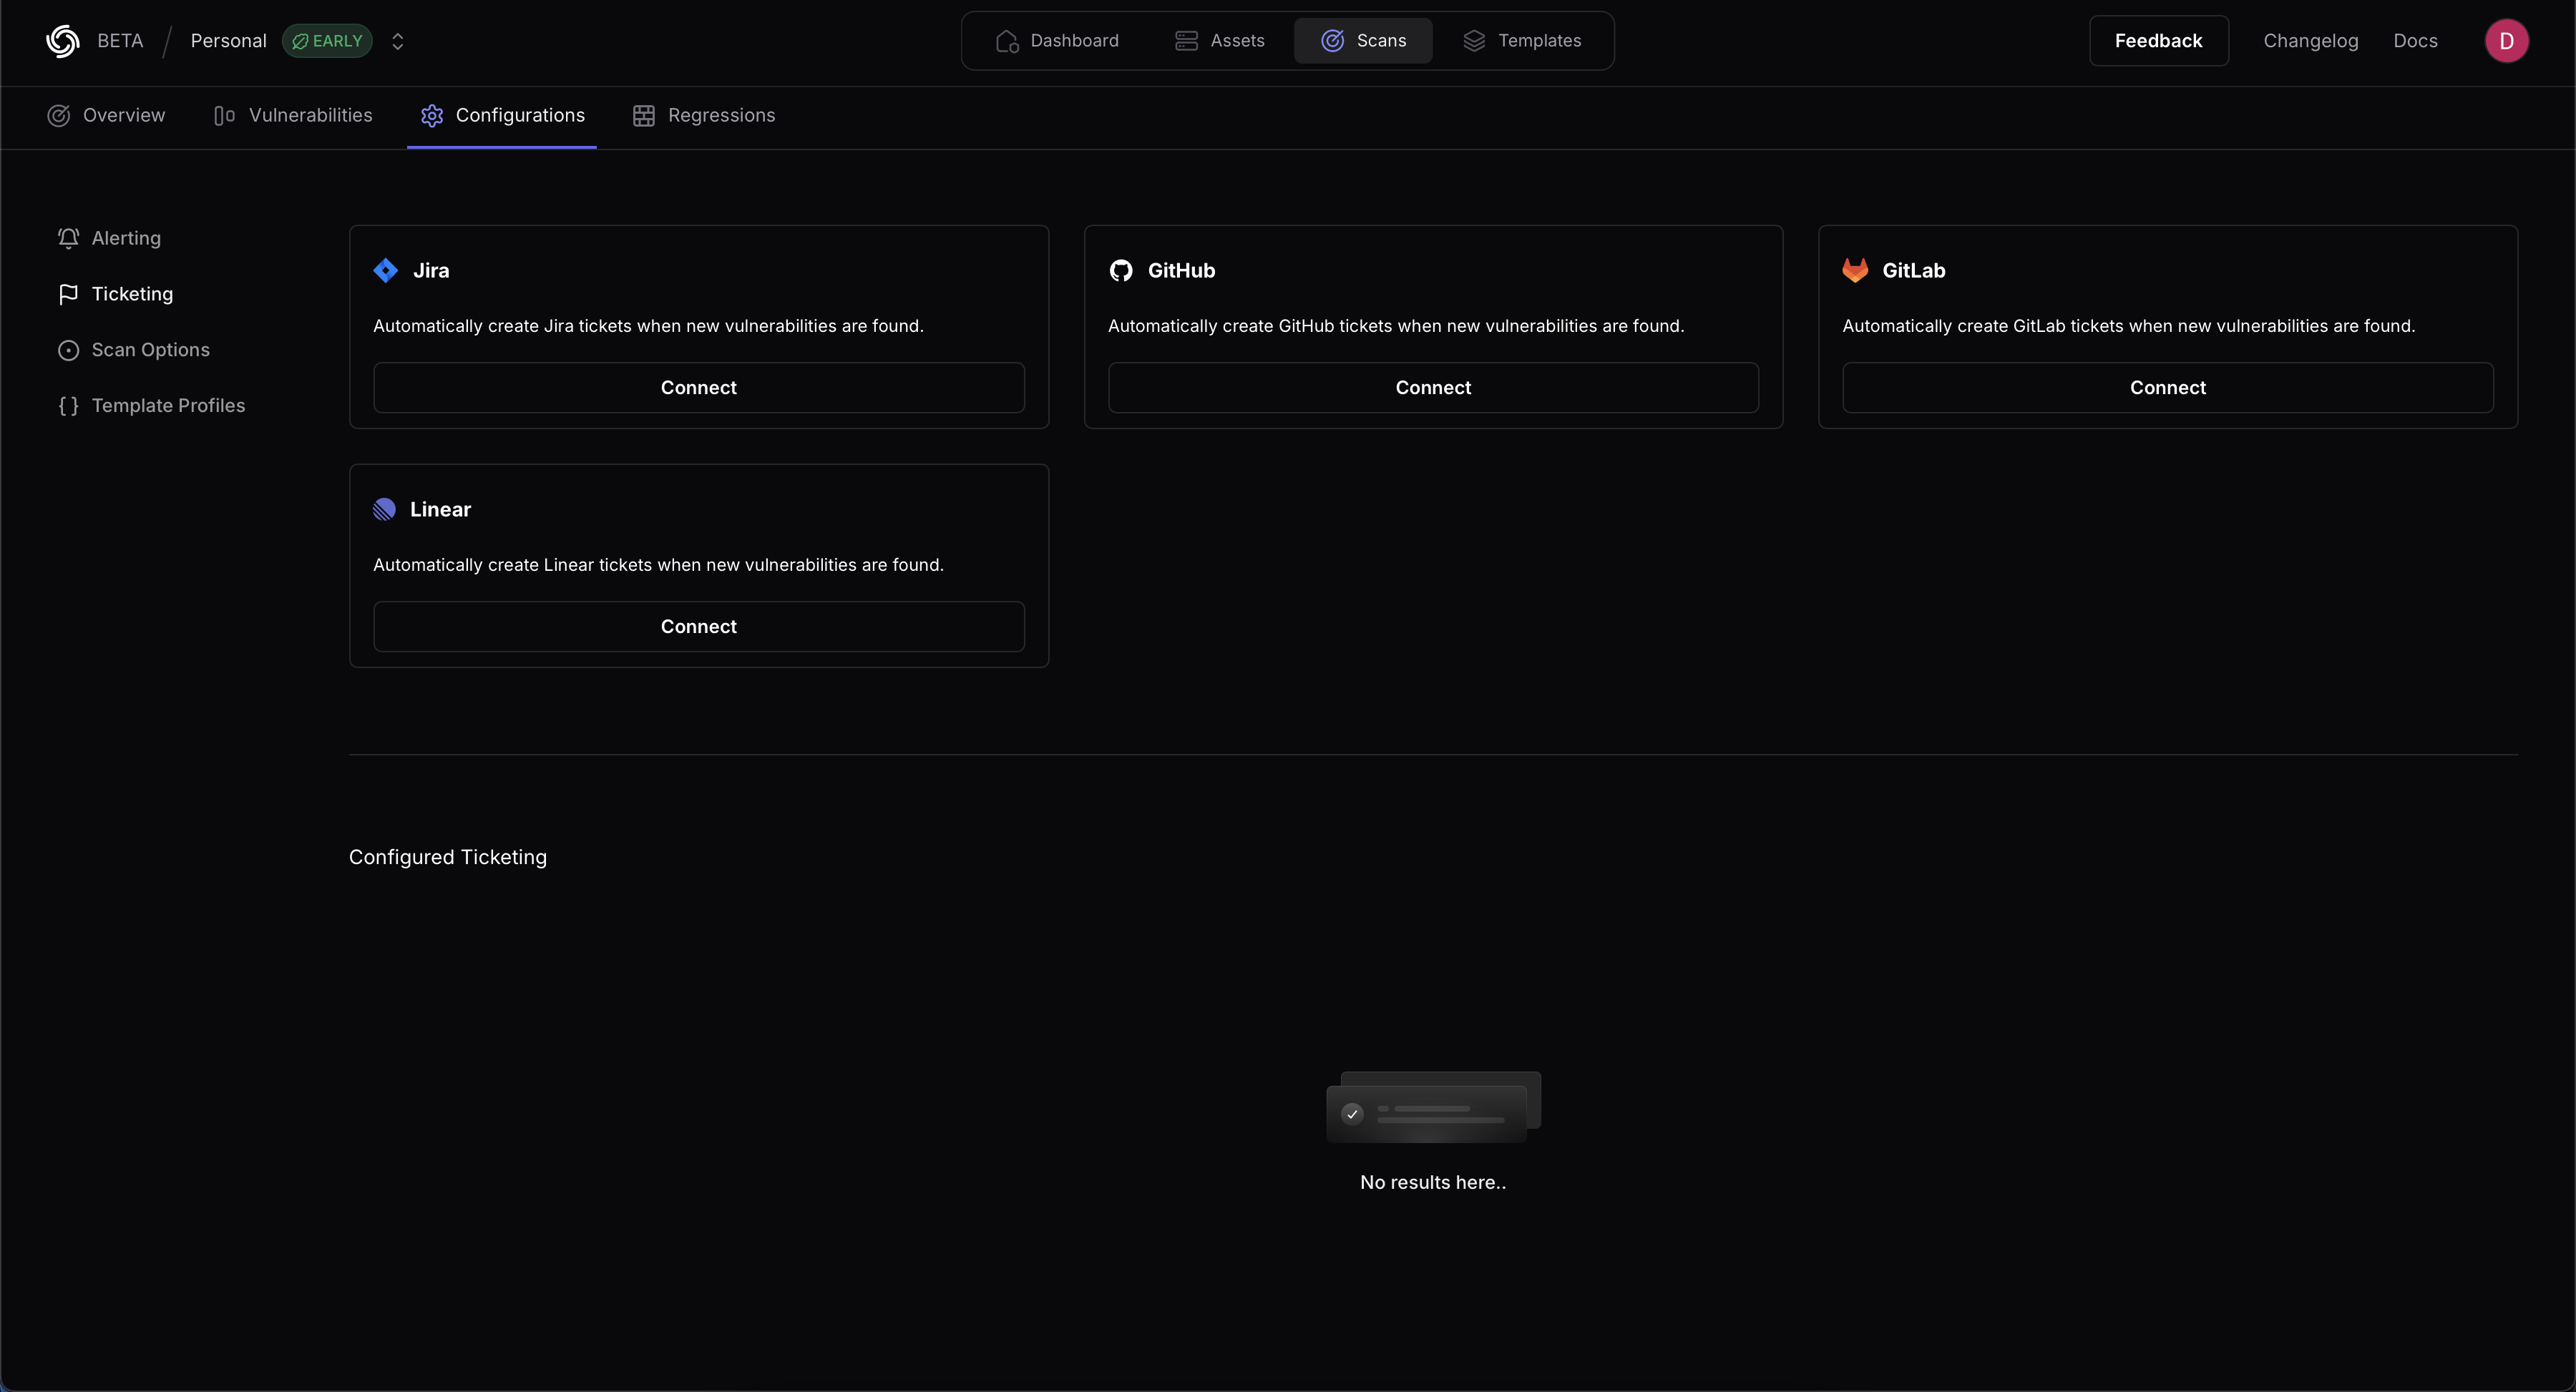
Jira
ProjectDiscovery provides integration support for Jira to create new tickets when vulnerabilities are found. Provide a name for the configuration, the Jira instance URL , the Account ID, the Email, and the associated API token. Details on creating an API token are available in the Jira documentation here.GitHub
ProjectDiscovery provides integration support for GitHub to create new tickets when vulnerabilities are found. Provide a name for the configuration, the Organization or username, Project name, Issue Assignee, Token, and Issue Label. The Issue Label determines when a ticket is created. (For example, if critical severity is selected, any issues with a critical severity will create a ticket.)- The severity as label option adds a template result severity to any GitHub issues created.
- Deduplicate posts any new results as comments on existing issues instead of creating new issues for the same result.
GitLab
ProjectDiscovery provides integration support for GitLab to create new tickets when vulnerabilities are found. Provide your GitLab username, Project name, Project Access Token and a GitLab Issue label. The Issue Label determines when a ticket is created. (For example, if critical severity is selected, any issues with a critical severity will create a ticket.)- The severity as label option adds a template result severity to any GitLab issues created.
- Deduplicate posts any new results as comments on existing issues instead of creating new issues for the same result.
Linear
ProjectDiscovery integrates with Linear for automated issue tracking. The integration requires the following API parameters:- Linear API Key
- Linear Team ID
- Linear Open State ID
- API Key Generation:
- Path: Linear > Settings > API > Personal API keys
- Direct URL: linear.app/[workspace]/settings/api
- Team ID Retrieval:
- Open State ID Retrieval:
Cloud Asset Discovery
ProjectDiscovery supports integrations with all popular cloud providers to automatically sync externally facing hosts for vulnerability scanning. This comprehensive approach ensures all your cloud resources with external exposure are continuously monitored, complementing our external discovery capabilities. The result is complete visibility of your attack surface across cloud environments through a simple web interface.AWS (Amazon Web Services)
Configure AWS Integration
Click here to open the AWS integration configuration page in the ProjectDiscovery Cloud platform
By covering these services, ProjectDiscovery can map out a broad range of AWS assets in your account. (Support for additional services may be added over time.)
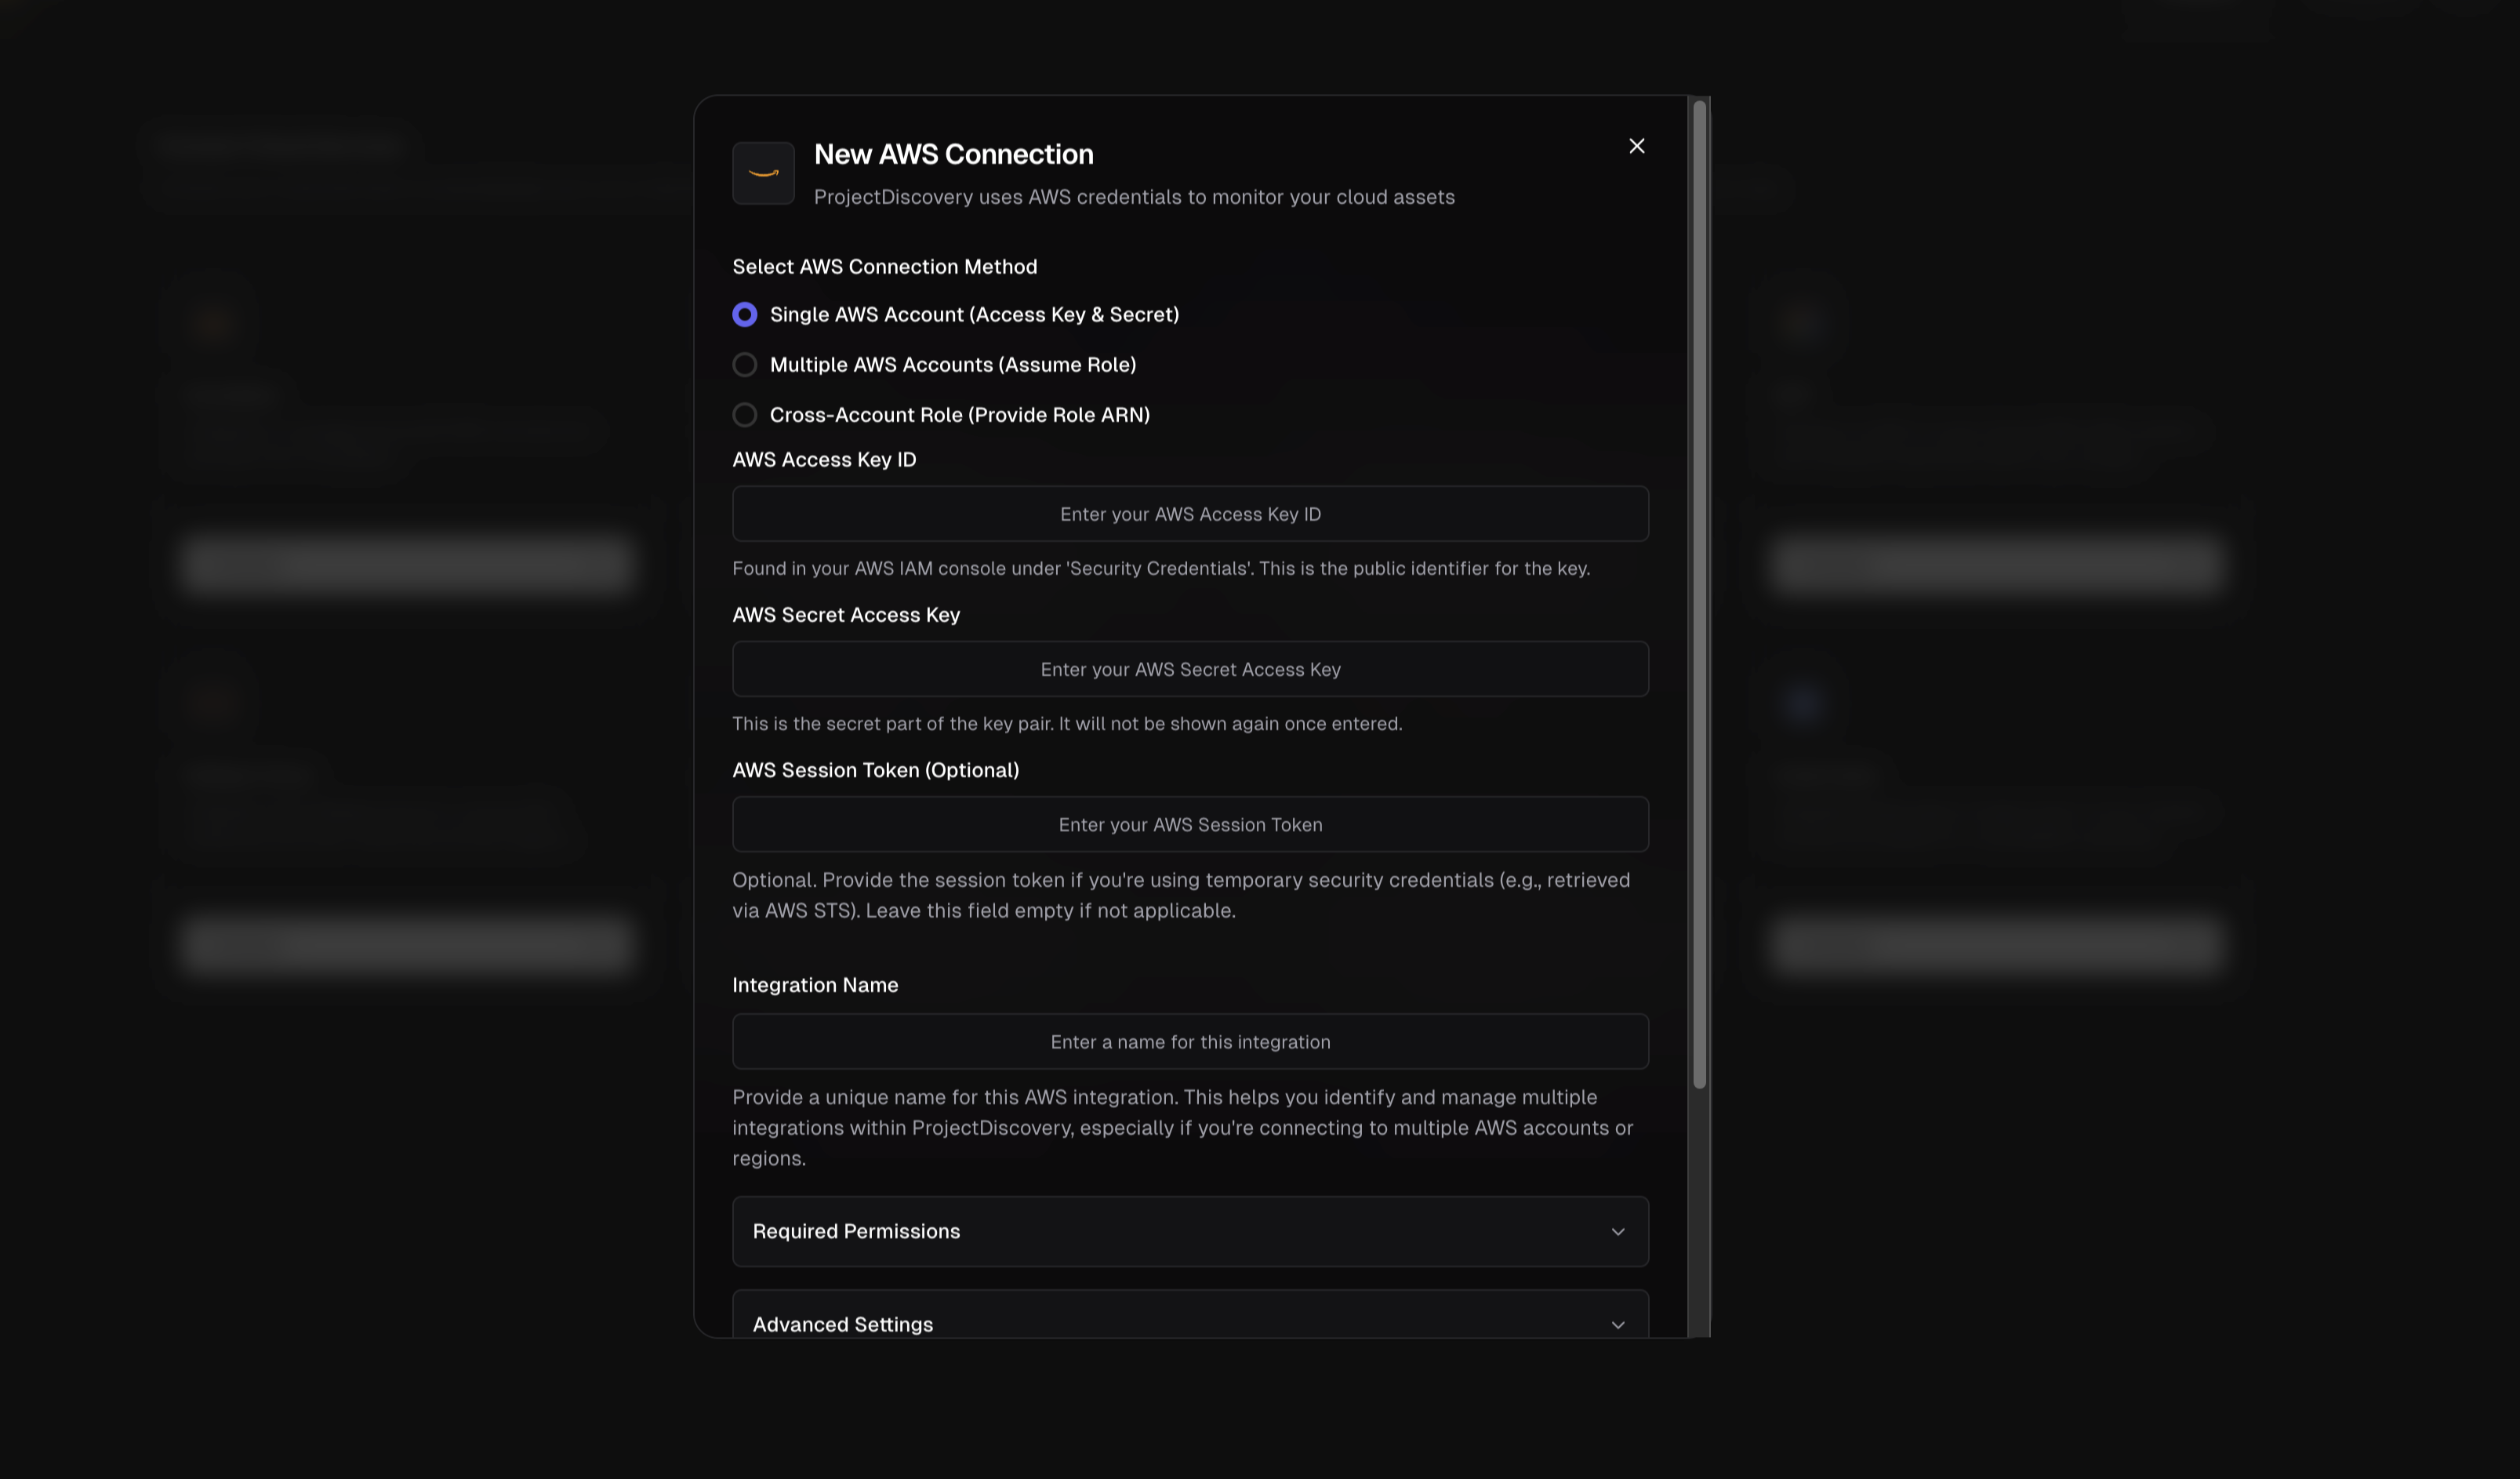
AWS Integration Methods
ProjectDiscovery supports four methods to connect to AWS, each suited for different use cases and security preferences:
- Single AWS Account (Access Key & Secret) – Direct credential-based authentication using an IAM User’s Access Key ID and Secret Access Key to connect one AWS account. Choose this for quick setups or single-account monitoring.
- Multiple AWS Accounts (Assume Role) – Use one set of credentials to assume roles in multiple accounts. This method is ideal for organizations with multiple AWS accounts (e.g. dev, prod, etc.). You provide one account’s credentials and the common role name that exists in all target accounts.
- Cross-Account Role (Role ARN) – Use a dedicated IAM role with an External ID for third-party access. This option lets you create a cross-account IAM role in your AWS account and grant ProjectDiscovery access via that role’s Amazon Resource Name (ARN).
- Workload Identity Federation (Recommended) – Connect without storing any AWS credentials. ProjectDiscovery’s OIDC identity provider exchanges short-lived tokens with AWS for each scan. This is the most secure method — no long-lived keys to manage, rotate, or risk leaking.
- AWS Account – Access to an AWS account where you can create IAM identities
- Admin Access to IAM – Permissions to create IAM users and roles
- ProjectDiscovery Account – Access to ProjectDiscovery’s Cloud platform
- Basic AWS IAM Knowledge – Understanding of IAM users, access keys, and roles
1. Single AWS Account (Access Key & Secret)
To connect a single AWS account directly:- Create a Read-Only IAM User: In the AWS IAM console, create a new IAM user for ProjectDiscovery integration. Assign programmatic access (which generates an Access Key ID and Secret Access Key).
- Attach Required Policies: Grant the user read-only permissions to the AWS services you want to monitor. You can use AWS-managed policies like AmazonEC2ReadOnlyAccess, AmazonS3ReadOnlyAccess, etc. for each service (see the Required Permissions section below).
- Configure in ProjectDiscovery:
- Select Single AWS Account (Access Key & Secret)
- Enter your AWS Access Key ID and AWS Secret Access Key
- Optionally provide a Session Token (only for temporary credentials)
- Give the integration a unique name
- Select the AWS services you want to monitor
2. Multiple AWS Accounts (Assume Role)
For monitoring multiple AWS accounts from a central account:- Choose a Primary Account: Create an IAM user in one AWS account (the “primary”) with programmatic access.
- Create an IAM Role in Each Target Account: In each AWS account you want to monitor, create a role that:
- Uses the same role name across all accounts (e.g., “ProjectDiscoveryReadOnlyRole”)
- Has a trust relationship allowing your primary account to assume it
- Has the required read-only permissions
- Configure in ProjectDiscovery:
- Select Multiple AWS Accounts (Assume Role)
- Enter the primary account’s AWS Access Key ID and Secret Access Key
- Specify the Role Name to Assume (the common role name)
- List all AWS Account IDs to monitor (one per line)
- Give the integration a unique name
- Select the AWS services you want to monitor
3. Cross-Account Role (Role ARN)
The most secure method using ProjectDiscovery’s service account:- Create an IAM Role in Your AWS Account:
- In your AWS console, go to IAM → Roles → Create Role
- Select “Another AWS account” as the trusted entity
- Enter ProjectDiscovery’s ARN:
arn:aws:iam::034362060511:user/projectdiscovery - Enable “Require External ID” and enter the External ID shown in the ProjectDiscovery UI
- Attach the necessary read-only permissions
- Configure in ProjectDiscovery:
- Select Cross-Account Role (Role ARN)
- Enter the Role ARN of the role you created
- Give the integration a unique name
- Select the AWS services you want to monitor
4. Workload Identity Federation (Recommended)
Recommended. Workload Identity Federation (WIF) eliminates long-lived AWS credentials entirely. ProjectDiscovery’s OIDC identity provider exchanges short-lived tokens with AWS STS for each scan — no access keys are stored or need rotation.
- No long-lived access keys to manage or rotate
- Tokens are short-lived and scoped per-scan
- Audit trail in AWS CloudTrail shows federated identity access
- Trust is scoped to your specific ProjectDiscovery workspace ID
- Follows AWS security best practices for third-party integrations
- An AWS account with IAM admin access
- AWS CLI configured (
aws configure) - Your ProjectDiscovery Team ID (found in the platform sidebar)
Finding your Team ID — In the ProjectDiscovery platform, click on your team name in the left sidebar to reveal your Team ID. Use the copy button to copy it.
arn:aws:iam::123456789012:oidc-provider/oidc.projectdiscovery.io).
Step 2: Create the WIF Role
Create an IAM role that ProjectDiscovery can assume via OIDC token exchange. The trust policy restricts access to your specific workspace.
For multiple accounts, repeat Step 3 in each account you want to scan — the role name must be the same (
PDScannerRole) across all accounts. Use AWS CloudFormation StackSets, Terraform, or similar infrastructure-as-code tools to deploy the scanner role across all accounts at once.
Click Verify to test the connection.
For a single account, enter just that account’s ID. For multiple accounts, list all account IDs — the scanner role must exist in each one.
Optional: Organization Discovery Instead of listing account IDs manually, you can have ProjectDiscovery automatically discover all accounts in your AWS Organization. Step 6: Create an Organization Discovery Role
This role must be created in the management (root) account of your AWS Organization — only the management account has permission to call
organizations:ListAccounts. If the WIF role already lives in the management account, use the same account ID for both variables.
Leave Account IDs empty — accounts are discovered automatically. Click Verify to test the connection.
AWS Troubleshooting
API Setup
You can set up the AWS integration entirely through the API. The process involves creating a cloudlist configuration, verifying it, and then using it to create an enumeration. The cloudlist configuration is a YAML array that must be base64-encoded before sending it to the API. Each connection method uses a different YAML structure, but the API calls are the same. Configuration FormatSingle AWS Account (Access Key & Secret)
Single AWS Account (Access Key & Secret)
Multiple AWS Accounts (Assume Role)
Multiple AWS Accounts (Assume Role)
Cross-Account Role (Role ARN)
Cross-Account Role (Role ARN)
external_id is displayed in the ProjectDiscovery UI when you select the Cross-Account Role method. You can also retrieve it from your account settings.The YAML configuration must be base64-encoded before passing it as the
config field in the API request. For example, using the command line: cat config.yaml | base64.While verification is optional, it is strongly recommended before creating the integration. This step validates that the credentials are correct and that ProjectDiscovery can successfully connect to your AWS account, saving you from debugging failed enumerations later.
id that you will use in the next step:
id from Step 2 to create a cloud asset enumeration:
- https://docs.aws.amazon.com/IAM/latest/UserGuide/id_roles_providers_create_oidc.html
- https://docs.aws.amazon.com/IAM/latest/UserGuide/id_credentials_access-keys.html
- https://docs.aws.amazon.com/sdkref/latest/guide/feature-assume-role-credentials.html
- https://docs.aws.amazon.com/organizations/latest/userguide/orgs_manage_accounts.html
Google Cloud Platform (GCP)
Configure GCP Integration
Click here to open the GCP integration configuration page in the ProjectDiscovery Cloud platform
Enumeration Scope
Enumeration scope determines what gets discovered. This applies regardless of which authentication method you choose.Project-Level
Discovers resources across all GCP projects where the service account has been granted access.When to use: Scope discovery to one or more specific projects.Configuration: Leave the
Organization ID field empty.Organization-Level
Discovers resources across all projects under your organization using the Cloud Asset Inventory API.When to use: Full visibility across your entire GCP organization.Configuration: Provide your numeric
Organization ID (e.g. 123456789012).Multi-Organization Support — Monitor multiple GCP organizations by creating separate integrations with different organization IDs for consolidated asset discovery across all your environments.
How to find your Organization ID
How to find your Organization ID
Your Organization ID is a numeric value (e.g.
123456789012).- Cloud Console
- gcloud CLI
- Organization Policies
- Go to the Google Cloud Console
- Click the project selector in the top navigation
- Click the All tab — your Organization ID is displayed next to your organization name
What happens if permissions don't match the scope?
What happens if permissions don't match the scope?
Organization-level enumeration requires roles bound at the organization level. If you provide an Organization ID but only have project-level permissions, enumeration will fail with a permission denied error. See the required roles in the Grant Permissions step of your chosen authentication method.
Authentication Methods
ProjectDiscovery supports two methods to authenticate with GCP. Both methods work with either enumeration scope.Service Account Key
Traditional JSON key file. Simpler to set up, but requires managing long-lived credentials.
Workload Identity Federation
Short-lived OIDC tokens. No credentials to manage or rotate. Recommended for security.
Service Account Key

- A GCP project where you can create service accounts
OwnerorIAM Adminrole on the project
projectdiscovery-scanner, and click Create and Continue.
Step 2: Grant Permissions
Grant the required roles based on your enumeration scope.
- Project-Level
- Organization-Level
Grant these roles via the Cloud Console IAM page or using
gcloud:How to find list of project IDs
How to find list of project IDs
The Project IDs field is optional. If you provide it, only those projects will be scanned (not all projects under the organization).To list the projects your service account can access:
Workload Identity Federation
Recommended. Workload Identity Federation (WIF) eliminates long-lived service account keys. ProjectDiscovery’s OIDC identity provider exchanges short-lived tokens (1 hour) with GCP for each enumeration — no credentials are stored or need rotation.

- No long-lived credentials to manage or rotate
- Tokens are short-lived (1 hour) and scoped per-enumeration
- Audit trail in GCP shows federated identity access
- Follows GCP security best practices
- A GCP project with billing enabled
OwnerorIAM Adminrole on the project (to create WIF resources)- The Cloud IAM API enabled on your project
- Project-Level
- Organization-Level
Grant these roles via the Cloud Console IAM page or using
gcloud:sub claim. Replace YOUR_TEAM_ID with your Team ID from the ProjectDiscovery platform.
Finding your Team ID — In the ProjectDiscovery platform, click on your team name in the left sidebar to reveal your Team ID. Use the copy button to copy it.
YOUR_PROJECT_NUMBER is the numeric project number, not the project ID. Find it with:
Click Verify to confirm the connection, then Create & Start Discovery.
How to find list of project IDs
How to find list of project IDs
The Project IDs field is optional. If you provide it, only those projects will be scanned (not all projects under the organization).To list the projects you can access:Run this as an org admin (or a principal with org-level visibility) if you need the full list of projects.
GCP Troubleshooting
“Google Cloud denied access” with Organization ID set The service account does not have permissions at the org level. Ensure all four org-level roles are granted:roles/cloudasset.viewer, roles/resourcemanager.organizationViewer, roles/resourcemanager.folderViewer, and roles/browser. See the Organization-Level tab in the Grant Permissions step for details.
“GCP token exchange failed” (WIF only)
- Verify the Workload Identity Provider path is correct (check for typos)
- Ensure the OIDC provider issuer URI is
https://oidc.projectdiscovery.io - Check the attribute mapping includes
google.subject=assertion.sub,attribute.sub=assertion.subin the OIDC provider configuration
- Verify
roles/iam.workloadIdentityUserbinding exists on the service account - Ensure the
attribute.subvalue in the member principal matches your Team ID - Ensure you used the correct project number (not project ID) in the member principal
- Check that the service account email is correct
attribute.sub path.
Security Notes:
- ProjectDiscovery only requires read-only access to enumerate your cloud assets
- With WIF, tokens are short-lived (1 hour max) and automatically expire after each enumeration — no credentials are stored
- You can revoke access at any time by removing IAM bindings or (for WIF) deleting the Workload Identity Pool
- https://cloud.google.com/iam/docs/service-account-overview
- https://cloud.google.com/iam/docs/keys-create-delete#creating
- https://cloud.google.com/asset-inventory/docs/overview
- https://cloud.google.com/iam/docs/workload-identity-federation
Azure
Configure Azure Integration
Click here to open the Azure integration configuration page in the ProjectDiscovery Cloud platform

- Virtual Machines
- Public IP Addresses
- Traffic Manager
- Storage Accounts
- Azure Kubernetes Service (AKS)
- Content Delivery Network (CDN)
- DNS Zones and Records
- Application Gateway & Load Balancer
- Container Instances
- App Service & Web Apps
- Azure Functions
- API Management
- Front Door
- Container Apps
- Static Web Apps
Quick Setup Options
For most users (Service Principal method): Create an App Registration in Azure Active Directory with the following required credentials:- Azure Tenant ID
- Azure Subscription ID
- Azure Client ID
- Azure Client Secret
- Create App Registration:
- Go to Azure Active Directory > App registrations > + New registration.
- From the app’s Overview page, collect the Application (client) ID and Directory (tenant) ID.
- Generate Client Secret:
- In the app, navigate to Certificates & secrets > + New client secret.
- CRITICAL: Copy the secret Value immediately, as it is shown only once.
- Assign Permissions:
- Go to your Subscription > Access control (IAM).
- Prefer a least-privilege custom role instead of the broad built-in Reader.
- Create a custom role (for example, “CloudList Reader”) with minimal actions and then assign it to the App Registration you created. Example definition:
- If you only need specific services, you can further reduce actions. For example:
- Virtual machines:
Microsoft.Compute/virtualMachines/read, plus RG/subscription reads - Public IPs:
Microsoft.Network/publicIPAddresses/read - Traffic Manager:
Microsoft.Network/trafficManagerProfiles/read - Storage Accounts:
Microsoft.Storage/storageAccounts/read - AKS Clusters:
Microsoft.ContainerService/managedClusters/read - CDN:
Microsoft.Cdn/profiles/read,Microsoft.Cdn/profiles/endpoints/read - DNS:
Microsoft.Network/dnszones/read,Microsoft.Network/dnszones/recordsets/read - App Services:
Microsoft.Web/sites/read - Functions:
Microsoft.Web/sites/functions/read - Container Apps:
Microsoft.App/containerApps/read
- Virtual machines:
- After creating the role, assign it to the App Registration under Role assignments.
- Alternatively, if creating custom roles is not feasible in your environment, you may assign the built-in Reader role to the App Registration. This provides broader read access across the subscription and may exceed least-privilege needs.
- Note your Subscription ID from the subscription’s overview page.
- Connect:
- Enter the four collected credentials (Tenant ID, Client ID, Client Secret, and Subscription ID) into ProjectDiscovery Cloud Platform to configure the integration.
- https://docs.microsoft.com/en-us/azure/active-directory/develop/howto-create-service-principal-portal
- https://learn.microsoft.com/en-us/azure/role-based-access-control/custom-roles-portal
- https://learn.microsoft.com/en-us/azure/active-directory/develop/app-objects-and-service-principals
Alibaba Cloud
Configure Alibaba Cloud Integration
Click here to open the Alibaba Cloud integration configuration page in the ProjectDiscovery Cloud platform

- ECS Instances
-
Create a RAM User for API Access:
- Navigate to the RAM (Resource Access Management) console. Ref
- From the left menu, go to Identities > Users and click Create User.
- Enter a Logon Name (e.g.,
projectdiscovery-readonly). - For Access Mode, select OpenAPI Access and click OK. This is for programmatic access, not console login.
-
Securely Store the Access Key: An AccessKey pair is generated immediately after the user is created. This is the only time the secret is shown.
On the confirmation screen, copy the AccessKey ID and the AccessKey Secret. Store them in a secure location immediately. The secret cannot be retrieved after you close this dialog.
-
Grant Read-Only Permissions:
- Return to the Users list.
- Find the user you just created and click Add Permissions in the Actions column.
- Select the System Policy type.
- Search for and select the
AliyunReadOnlyAccesspolicy and click OK. This is the official, managed policy for read-only access to all cloud resources.
-
Find Your Region ID and Connect:
- Identify the Region ID for the resources you plan to monitor. You can find the official list in the Alibaba Cloud documentation here: Regions and zones (This link lists the specific IDs required for API configuration).
- Use the credentials you have collected to fill in the fields in ProjectDiscovery:
- Alibaba Region ID: The target region, for example,
us-east-1. - Alibaba Access Key: The AccessKey ID from Step 2.
- Alibaba Access Key Secret: The AccessKey Secret from Step 2.
- Alibaba Region ID: The target region, for example,
- Enter a unique Integration Name and click Verify.
- https://www.alibabacloud.com/help/faq-detail/142101.htm
- https://www.alibabacloud.com/help/doc-detail/53045.htm
Kubernetes
Configure Kubernetes Integration
Click here to open the Kubernetes integration configuration page in the ProjectDiscovery Cloud platform

- Services
- Ingresses
- Cross-cloud cluster discovery
Cluster Accessibility: Before attempting integration, ensure your Kubernetes cluster has public/external endpoints that ProjectDiscovery can access. This includes:
- Publicly accessible API servers
- External load balancers exposing services
- Internet-facing ingress controllers
- Clusters with public IP addresses
-
Prepare Base64-Encoded Kubeconfig
-
Your kubeconfig file is typically located at:
-
Encode it using:
-
Paste the output into the Kubeconfig field in the UI.
⚠️ Ensure the entire content is copied without extra whitespace.
-
Your kubeconfig file is typically located at:
-
Specify Context (Optional)
-
If your kubeconfig has multiple contexts, find them with:
-
To view the current context:
- Use the relevant context name if required.
-
If your kubeconfig has multiple contexts, find them with:
- Define Integration Name & Verify Choose a unique, descriptive name for this integration and click Verify to complete the integration.
- Internal Clusters: Clusters only accessible within private networks (VPN, internal VPCs) cannot be reached by ProjectDiscovery
- Firewall Restrictions: Ensure your cluster’s API server and services are accessible from the internet
- Network Policies: Check that network policies allow external access to required endpoints
- Load Balancer Configuration: Verify that external load balancers are properly configured and accessible
Alternative for Internal Clusters: For internal-only Kubernetes clusters, consider using the cloud provider integration (AWS EKS, GCP GKE, Azure AKS) which can discover cluster endpoints through the cloud provider’s APIs, or manually add the cluster’s external endpoints as assets.
Cloudflare
Configure Cloudflare Integration
Click here to open the Cloudflare integration configuration page in the ProjectDiscovery Cloud platform

- DNS and CDN assets
Connecting a Cloudflare integration also enables origin IP exposure detection under Misconfigurations. When a hostname from your asset inventory resolves to the same IP as the origin behind one of your proxied Cloudflare records, it is flagged as an origin exposure finding.
- Global API Key
- Go to Cloudflare Dashboard.
- Under “API Keys”, locate the Global API Key and click View.
- Authenticate and copy the key.
- Now enter the Cloudflare account email and Global API Key copied in above step into ProjectDiscovery Cloud Platform.
- Give a unique Integration name and click Verify.
- API Token (Recommended)
- From the Cloudflare dashboard ↗, go to My Profile > API Tokens.
- Select Create Token > choose Create Custom Token.
-
Set the following read-only permissions required for asset discovery:
- Under Zone Resources, select All zones (or choose specific zones to limit scope).
- Click Continue to summary > Create Token and copy the generated token.
- Now enter the API Token in ProjectDiscovery Cloud Platform.
- Give a unique Integration name and click Verify.
- https://developers.cloudflare.com/fundamentals/api/get-started/create-token/
- https://developers.cloudflare.com/fundamentals/api/reference/permissions/
Fastly
Configure Fastly Integration
Click here to open the Fastly integration configuration page in the ProjectDiscovery Cloud platform

- Go to Fastly account settings.
- Under API, click Create API token if you don’t already have one.
- Copy the API Key.
- Now enter API Key in ProjectDiscovery Cloud Platform.
- Give a unique Integration name and click Verify.
DigitalOcean
Configure DigitalOcean Integration
Click here to open the DigitalOcean integration configuration page in the ProjectDiscovery Cloud platform

- Go to DigitalOcean API Settings.
- Click Generate New Token
- Provide a name and enable read-only access scope
- Copy the token
- Now enter token in ProjectDiscovery Cloud Platform.
- Give a unique Integration name and click Verify.
- Droplets and managed services